DS1C-BD
Issue 1 June 2005 1091
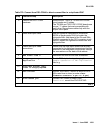
8. Remove the DS1- CONV
hardware.
Remove the 4 TN574 or TN1654 DS1-CONV
circuit packs and Y-cables.
The TN1654 and TN574 DS1-CONV boards use
unique “Y” cables that are incompatible with
each other. Reuse these cables only with the
proper circuit pack.
9. Install fiber-optic cable. Add the lightwave transceivers (multimode
9823A or single-mode 300A) to match the
lightguide fiber. Add these to the EIs and SNIs
formerly connected to the DS1 converter circuit
packs. Connect the lightwave transceivers with
lightguide fiber.
10. Check fiber-optic cable
connections.
Ensure that the fiber-optic cables are securely
connected to the lightwave transceivers that are
attached to the designated circuit packs through
the connections on the back of the cabinet.
11. add fiber-link n Administer the new EI/SNI fiber connection.
12. change system-parameters
duplication
Enable PNC duplication by changing the
Enable Operation of PNC Duplication
field to y.
13. Enter test alarms long
clear for category exp-intf.
14. Wait 5 minutes. SNI-BD, SNI-PEER, FIBER-LK and EXP-INTF
MOs need time to clear (or enter clear
firmware-counters a-pnc or b-pnc)
15. Enter status pnc. If either PNC’s state of health is not
functional, consult the PNC-DUP MO.
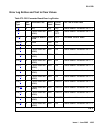
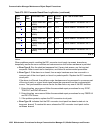
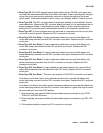
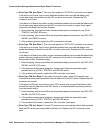
Table 370: Convert from DS1-CONV to direct-connect fiber in a duplicated PNC
Step Command/Step Description
2 of 2


