


392 FSN Series • User’s Guide • Rev 01
8. DVE Operations
Programming DVE Effects
h. Press {Back} to return to the main DVE Menu Palette.
3. Store the keyframe in a shot box register:
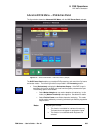
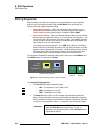
a. Press {Shot Box} to display the Shot Box Menu.
b. Select a register range using the “register panel” buttons (e.g., {1 - 32}).
c. Press {Save Shot Box KF}, the press the desired shot box button in
which you want to store the keyframe.
d. When the Keyboard appears, name the new shot box register. Note
that if you save to an existing register, the previous name is retained.
You can re-name the register by pressing
{Name Shot Box KF}.
4. Repeat from step 1c to create additional keyframes, and store them in shot box
registers.
5. To store and name single keyframe DVE effects in memory:
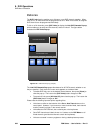
a. Press {Shot Box} to display the Shot Box Menu.
b. Press the button for the shot box register that you wish to use, and
ensure that its name appears in the
Keyframe Editing Section,
underneath the keyframe 1 button. This keyframe is now “active.”
c. Press STORE in the control panel’s Memory Section, de-select all
modules except
DVE, enter a register number and press ENTER.
d. In the Menu Bar, press {Memory} to access the Memory Menu,
navigate to the register you just stored, and press
{Description}.
e. When the keyboard appears, name the register.
f. Repeat from step 5a to store and name additional effects.
This completes the procedure for programming and storing single keyframe DVE effects
mêçÖê~ããáåÖ=aì~ä=hÉóÑê~ãÉ=bÑÑÉÅíë
Use the following steps to program dual keyframe DVE effects.
1. On the Effect Setup Panel, set up a new effect by pressing {New Effect}, then
key the DVE channel so that it is visible.
2. To design the first keyframe, manipulate the image as desired, using any
combination of the available DVE tools.
3. Store the keyframe in a shot box register:
4. Create the second keyframe, and “run” to it so that it is visible on PGM or PST:
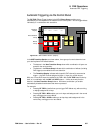
a. On the Effect Setup Panel, press {Add KF} to add a second keyframe.
The system duplicates the current keyframe, and automatically makes
keyframe
2 active.
b. Press the Forward (X) button to run the effect from keyframe 1 to 2.
5. To design the second keyframe, manipulate the image as desired, using any
combination of the available DVE tools.
Note
Steps 1 through 3 are identical to those used for creating
single keyframes, as outlined in the previous “
Programming
Single Keyframe Effects” section. These three steps are
abbreviated below.