


FSN Series • User’s Guide • Rev 01 319
7. Operations
Understanding Lookahead Preview
råÇÉêëí~åÇáåÖ=iççâ~ÜÉ~Ç=mêÉîáÉï
The following topics are discussed in this section:
• Lookahead Preview Overview
• Lookahead Preview Tutorial
iççâ~ÜÉ~Ç=mêÉîáÉï=lîÉêîáÉï
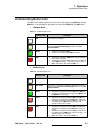
Each bank’s PVW (Preview) output serves as a versatile “lookahead” output. These
outputs work in conjunction with the buttons in each bank’s
Next Transition Group to
show you exactly how the bank’s layers will appear — after the next
CUT, MIX, KEY, WIPE,
or
AUTO TRAN is performed.
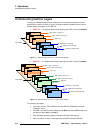
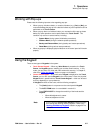
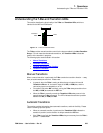
The figure below illustrates the
Next Transition Group on the M/E and PGM banks:
Figure 7-5. Next Transition Groups
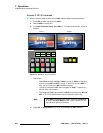
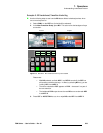
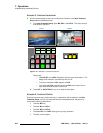
In each Next Transition Group, the buttons that you enable determine the combination of
layers that are “armed” for the next transition, and also determine what you “see” on each
bank’s
PVW monitor. If a layer is armed, it will appear on PVW.
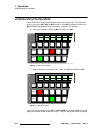
To use the
Next Transition Group, simultaneously press the combination of buttons that
you wish to enable. Any combination of buttons can be pressed. Whichever combination
you enable automatically disables those buttons that were not pressed.
• In Chapter 3, refer to the “M/E Transition Section” heading on page 83 for details
on the M/E bank’s
Next Transition Group.
• In Chapter 3, refer to the “PGM Transition Section” heading on page 76 for
details on the Program bank’s
Next Transition Group.
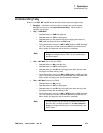
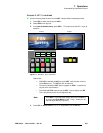
The tutorial in the next section provide examples of
how selections in the Next Transition
Group
affect the lookahead preview output. In the tutorial, you’ll need four sources, for
example:
• A BG source (e.g., CAM1)
• A PST source (CAM2)
• A KEY 1 source (GFX)
• A KEY 2 source (LOGO).
BG
KEY
1
KEY
2
BG DSK
M/E Bank
PGM Bank
Important
A monitor must be connected to the bank’s PVW output in
order to view the “lookahead” video output.