72
8.8 Set-up DIDO, AI and PI controller
Setting up each function of DIDO controller, AI controller and PI controller.
8.8.1 Setting Procedure and Restrictions
Check the setting procedure and restrictions before setting-up DIDO controller, AI controller and PI controller.
[Operation Method]
1) Click the [DIDO,AI,PI controller set-up] button.
Click the [DIDO,AI,PI controller set-up] button from system
setting group in the initial window.
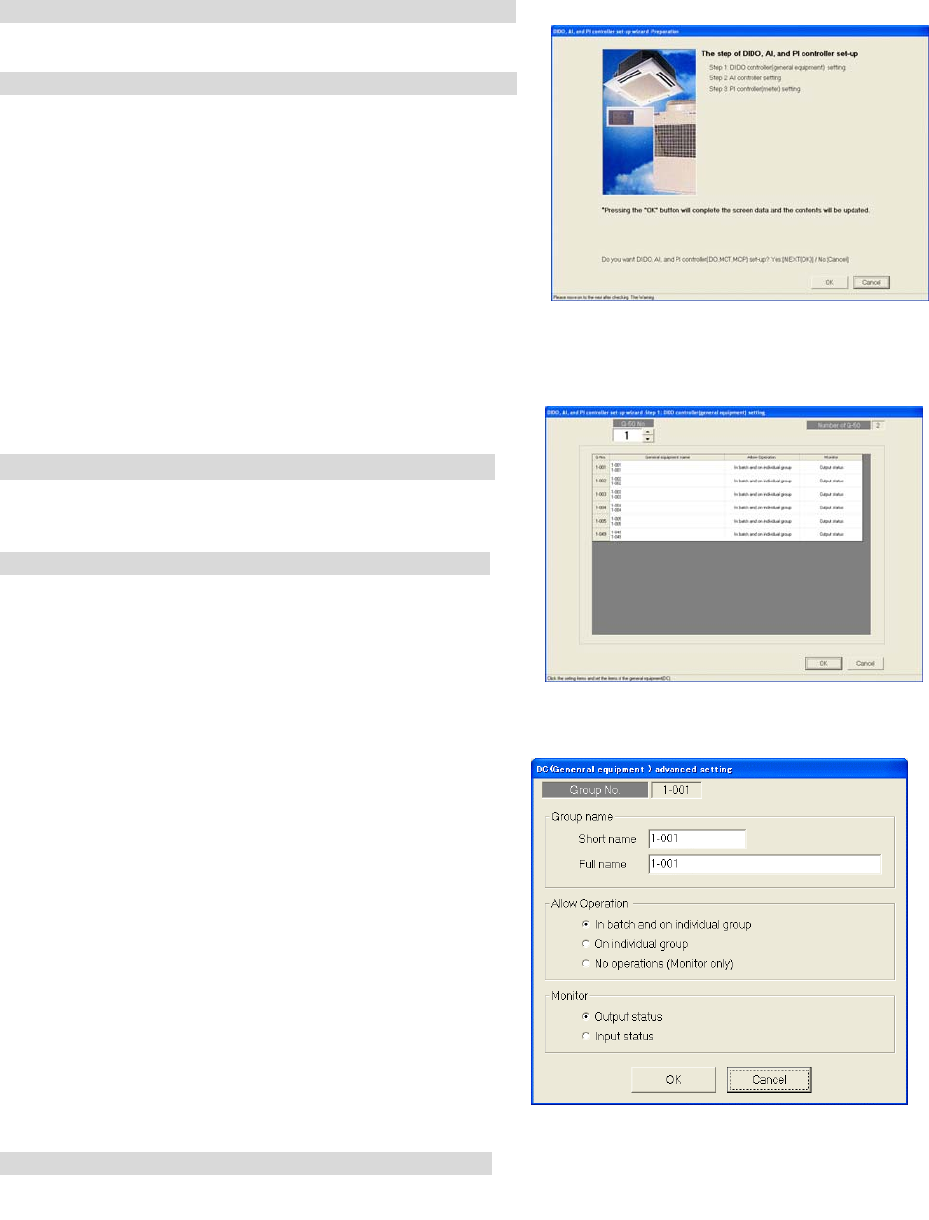
2) Read the message that appears and click the [OK] button.
Read the warning message on the preparation
screen.
※
Click the [Cancel] button to cancel the procedure and
return to the initial window.
Procedure of setting-up DIDO, AI and PI controller.
Step 1 DIDO controller (General equipment) setting
Step 2 AI controller setting
Step 3 PI controller (Meter) setting
8.8.2 DIDO controller(general equipment) set-up(Step 1)
Set-up function of DIDO controller (DC)
[Operation Method]
1) Select AG-150A/G-50 No. with the ▲/▼ button.
Select AG-150A/G-50A No. connected to DC with
the ▲/▼ button.
2) Set-up the detail of general equipment(DC)
Select the general equipment (DC)
Detail setting screen will appear. Please make the settings
bellow.
Group name : Short name (8 characters or less)
Full name (20 characters or less)
Allow Operation: the operate restriction of the general
equipment setting
Select an option from the following to reflect or not
reflect the on/off status change when a batch
operation is performed.
Check the radio button next to [In batch and on individual
group] to reflect the on/off status. Check the radio
button next to [On individual group] to reflect the change
on certain groups. Check the radio button next to
[No operations (Monitor only)] for the change not to be
reflected.
Monitor : the state indicate of general
equipment setting.
Either the output status to the general equipment or
input from the general equipment can be selected for
the on/off status that appears on the monitor screen.
3) Click the [OK] button.
When the setting is completed, click the [OK] button.
※Click the [Cancel] button to cancel the procedure and return to the initial
window.
Preparation screen
DC (general equipment) Setting screen
DC (general equipment)
advanced setting screen
