


Bosch Security Systems | 2011-02
Praesideo 3.5 | Installation and User Instructions | 9 | System Configuration en | 370
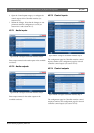
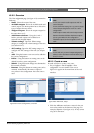
4 Browse to the WAV file that has to be added to the
message set and select it.
5 Click the > button to add the WAV file to the
message set.
6 Repeat steps 4 and 5 to add additional WAV files to
the message set. The Up and Down buttons can be
used to change the order of the messages in the set.
7 Enter a name for the message set in the Message Set
field.
8 Click the Save Message Set as button to save the
message set on the configuration PC. The message
set has been created. For instruction about
transferring the message set to the network
controller, see section 44.3.4.
44.3.3 High efficiency alarm tones
Four different high-efficiency alarm tones are on the
distribution DVD in the folder \Tools\Audio Tools and
Sounds\High efficiency alarm tones. Because the tones are
too complex to be generated in real time as start tone or
end tone by the Praesideo system, these tones are
designed as special multi-sine wav-files and should be
used as messages in a call macro.
The tones are perceptually very loud and still have a
limited RMS value of -6 dBFS, so they can be played
back continuously without overheating the amplifiers.
Also power consumption of the amplifiers will be
reduced by 50% compared to normal sine alarm tones,
that are scaled to -3 dBFS in Praesideo. However,
although these high efficiency tones sound much louder
than normal sine waves, a dBSPL measurement will not
show this. This is because a normal dBSPL
measurement does not take the applied psycho-acoustic
factors into account. The high efficiency alarm tones are
particularly useful for situations with much background
noise, where a normal sine wave would be easily
masked
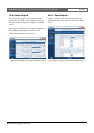
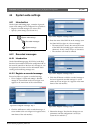
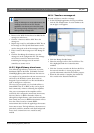
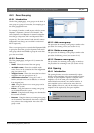
44.3.4 Transfer a message set
Proceed as follows to transfer a message:
1In the File Transfer application, first log in and then
click the File Transfer button. A screen similar to the
one in figure 44.10 appears.
2 Click the Message Set radio button.
3 Select the message set file in the Local PC box. The
file is highlighted and the > button becomes
available.
4 Click the > button to transfer the file from the PC to
the network controller. A screen pops up that
provides information about the file transfer progress.
5 When the file transfer is complete, the transferred
file is visible in the Network Controller box.
Note
Using the Message set mode radio buttons, the
message set screen of the File Transfer
application can also be put in the View mode
(for viewing existing message sets) or Edit (for
editing existing message sets.
figure 44.10: Transferring a message set