


178
APPLYING EFFECTS CHP. 11
Automating Effect Parameters
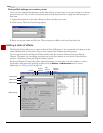
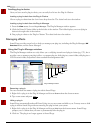
When you add an effect that supports automation to the Plug-In Chainer, a list of the effect’s automatable
parameters is displayed on the right side of the window. You can use these controls to add, show/hide, and
enable/bypass automation envelopes.
Plug-in parameters can be edited using the automation envelope in the data window.
Note:
Choosing a new effect chain preset will clear the
current effect automation settings.
Adding an effect automation envelope
1.
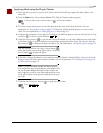
In the Plug-In Chainer, select the button ( ) for an effect that includes automatable parameters.
The plug-in's controls are displayed, and a list of the effect's automatable parameters is displayed on the
right side of the Plug-In Chainer.
Tip:
The Parameter Chooser is displayed on the right side of
the Plug-In Chainer window when you add a plug-in that
supports automation. Click the Show Parameter Chooser
button () or press + to show or hide the chooser.
2.
Select the Automate check box for each parameter you want to control with an envelope. An envelope is
added to the data window for each selected check box.
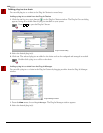
Adding a volume or panning envelope
Panning envelopes will have no effect on mono source data. Convert mono sound data to stereo before
adding a panning envelope.
1.
Click within a data window to give it focus.
2.
Press to add a volume envelope, or press to add a panning envelope.
Sound Forge adds an envelope to the data window and adds the Sound Forge Volume or Sound Forge Pan
plug-in to the Audio Plug-In Chainer. If the Plug-In Chainer is not visible, Sound Forge will open it.
Note:
If a data window already has a volume envelope,
pressing P or V will hide the envelope.
3.
Adjust volume or panning with the envelope in the data window.
Ctrl
H
V P