


114
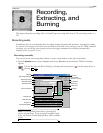
RECORDING, EXTRACTING, AND BURNING CHP. 8
2.
From the Method drop-down list, choose Normal.
3.
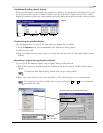
Choose the destination data window for your recording. By default, Sound Forge records into the active
data window. If this is not where you want to record, use one of the following methods to prepare for
recording:
• To record into a different data window, click the
Window button and choose a data window from the
Record destination window drop-down list. Click OK to return to the Record dialog.
-or-
• To record into a new window, click the
New button in the Record dialog and specify the attributes
(sample rate, bit depth, and channels) for the new file. Click
OK to return to the Record dialog.
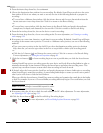
4.
From the Device drop-down list, choose the device to use for recording.
5.
From the Mode drop-down list, choose a recording mode. For more information, see Choosing a recording
mode on page 119.
6.
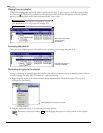
If necessary, set a start time, duration, or end time for your recording. By default, Sound Forge will begin
recording at the current cursor position. To record to a different cursor position, use one of the following
methods:
• Type a new cursor position in the
Start field. If you chose the Punch In recording option in the Mode
drop-down list, you can also type values in the
End or Length fields to define your recording period.
-or-
• Click the Go To button ( ) and change the cursor position. Click OK to return to the Record dialog.
For more information, see Setting the cursor position on page 69.
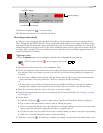
7.
Click the Arm button ( ) to have recording begin as soon as possible after you click the Record button
().
Arming Sound Forge prior to recording opens the wave device and loads all recording buffers in order to
minimize the amount of time between clicking the
Record button and when the recording starts. This
optional step can allow for more accurate takes when recording in Punch-In mode.
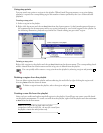
8.
If desired, select the Prerecord buffer check box and specify the amount of time to buffer prior to recording
when Sound Forge is armed for recording. A prerecording buffer helps to ensure you won't miss a perfect
take if you're a bit slow to click the
Record button.
When you click the
Record button, Sound Forge starts recording and commits the sound data in the buffer
to disk. For example, if you set a 15-second buffer, recording effectively begins 15 seconds before you click
the
Record button.
Note:
The prerecord buffer is unavailable in punch-in mode.
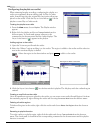
9.
If necessary, select the DC Adjust check box and calibrate the DC offset adjustment. For more information,
see Adjusting for DC offset on page 121.
10.
Click the Record button ( ) in the Record dialog. Recording begins.
Press + . For more information, see Record dialog keyboard shortcuts on page 262.
Alt
R