


116
RECORDING, EXTRACTING, AND BURNING CHP. 8
8.
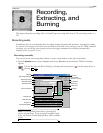
To end timed recording, click the Stop button ( ).
9.
Click the Close button to close the Record dialog.
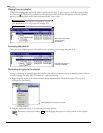
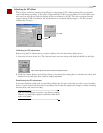
Triggering by a set threshold
When you’re using threshold-triggered recording, you can choose to record continuously: set a buffer size,
and Sound Forge will record to fill the buffer, discarding the oldest data as new data is recorded. If you want
to save data from the buffer, you can save it to disk.
1.
From the Special menu, choose Transport, and then choose Record from the submenu.
Click the
Record button ( ) on the transport bar or press + .
2.
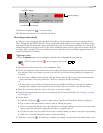
From the Method drop-down list, choose Automatic: Threshold.
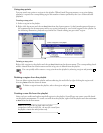
3.
Choose the destination data window for your recording. By default, Sound Forge records into the active
data window. If this is not where you want to record, use one of the following methods to prepare for
recording:
• To record into a different data window, click the
Window button and choose a data window from the
Record destination window drop-down list. Click OK to return to the Record dialog.
-or-
• To record into a new window, click the
New button in the Record dialog and specify the attributes
(sample rate, bit depth, and channels) for the new file. Click
OK to return to the Record dialog.
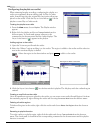
4.
From the Device drop-down list, choose the device to use for recording.
5.
From the Mode drop-down list, choose a recording mode. For more information, see Choosing a recording
mode on page 119.
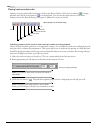
6.
Drag the Threshold slider control to set the audio level at which you want recording to begin. Sound Forge
monitors the audio levels until they reach the level you choose, and then begins recording.
7.
Drag the Release slider control to set the amount of time the audio level should be below your Threshold
level before Sound Forge stops recording.
8.
Select the Automatically rearm after record check box if you want Sound Forge to be able to immediately
record again after your initial threshold recording. Sound Forge will return to monitoring audio levels
after each recording if this check box is selected.
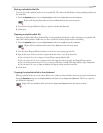
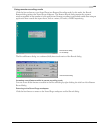
9.
Select the Prerecord buffer check box and type a value in the edit box to maintain a set amount of time in
a buffer when Sound Forge is armed for recording. A safety buffer helps to ensure you won’t miss a perfect
take if you set the threshold a bit too high.
When the prerecord buffer is enabled, Sound Forge starts recording when the audio input reaches the
threshold level and commits the sound data in the buffer to disk. For example, if you set a 15-second
buffer, recording effectively begins 15 seconds before the input reaches the set threshold level.
10.
Click the Arm button ( ). Sound Forge is armed for recording to begin when audio levels reach your set
threshold.
11.
To end audio monitoring and recording, click the Stop button ( ).
12.
Click the Close button to close the Record dialog.
Ctrl
R