


4-14
Cisco Intrusion Prevention System CLI Sensor Configuration Guide for IPS 7.1
OL-19892-01
Chapter 4 Setting Up the Sensor
Changing Web Server Settings
Step 5 Change the value back to the default.
sensor(config-aut)# default cli-inactivity-timeout
Step 6 Verify the value has been set back to the default.
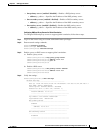
sensor(config-aut)# show settings
attemptLimit: 0 <defaulted>
password-strength
-----------------------------------------------
size: 8-64 <defaulted>
digits-min: 0 <defaulted>
uppercase-min: 0 <defaulted>
lowercase-min: 0 <defaulted>
other-min: 0 <defaulted>
number-old-passwords: 0 <defaulted>
-----------------------------------------------
permit-packet-logging: true <defaulted>
cli-inactivity-timeout: 0 <defaulted>
sensor(config-aut)#
Step 7 Exit authentication mode.
sensor(config-aut)# exit
Apply Changes:?[yes]:
Step 8 Press Enter to apply the changes or enter no to discard them.
Changing Web Server Settings
Note The default web server port is 443 if TLS is enabled and 80 if TLS is disabled.
After you run the setup command, you can change the following web server settings: the web server port,
whether TLS encryption is being used, and the HTTP server header message.
HTTP is the protocol that web clients use to make requests from web servers. The HTTP specification
requires a server to identify itself in each response. Attackers sometimes exploit this protocol feature to
perform reconnaissance. If the IPS web server identified itself by providing a predictable response, an
attacker might learn that an IPS sensor is present.
We recommend that you not reveal to attackers that you have an IPS sensor. Change the server-id to
anything that does not reveal any information, especially if your web server is available to the Internet.
For example, if you forward a port through a firewall so you can monitor a sensor remotely, you need to
set the server-id.
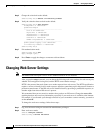
To change the web server settings, follow these steps:
Step 1 Log in to the sensor using an account with administrator privileges.
Step 2 Enter web server mode.
sensor# configure terminal
sensor(config)# service web-server