


A-22
Cisco Intrusion Prevention System CLI Sensor Configuration Guide for IPS 7.1
OL-19892-01
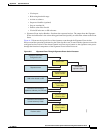
Appendix A System Architecture
MainApp
The IPS web server and SSH server are server endpoints of encrypted communications. They protect
their identities with a private key and offer a public key to clients that connect to them. For TLS this
public key is included inside an X.509 certificate, which includes other information. Remote systems
that connect to the sensor should verify that the public key received during connection establishment is
the key they expect.
Clients must maintain a list of trusted public keys to protect themselves from man-in-the-middle attacks.
The exact procedure by which this trust is established varies depending on the protocol and client
software. In general, the client displays a fingerprint of 16 or 20 bytes. The human operator who is
configuring the client to establish trust should use an out-of-band method to learn the key fingerprints
of the server before attempting to establish trust. If the fingerprints match, the trust relationship is
established and henceforth the client can automatically connect with that server and be confident that the
remote server is not an imposter.
You can use the show ssh server-key and show tls fingerprint to display the key fingerprints of the
sensor. By recording the output of these commands when directly connected to the sensor console, you
can reliably use this information to confirm the identity of the sensor over the network later when
establishing trust relationships.
For example, when you initially connect to a sensor through the Microsoft Internet Explorer web
browser, a security warning dialog box indicates that the certificate is not trusted. Using the user
interface of Internet Explorer, you can inspect the certificate thumbprint, a value that should exactly
match the SHA1 fingerprint displayed by the show tls fingerprint command. After verifying this, add
this certificate to the list of trusted CAs of the browser to establish permanent trust.
Each TLS client has different procedures for establishing this trust. The sensor itself includes a TLS
client that is used to send control transactions to other sensors and download upgrades and configuration
files from other TLS web servers. Use the tls trusted-host command to establish trust of the TLS servers
with which the sensor communicates.
Similarly, the sensor includes an SSH client that is used to communicate with managed network devices,
download upgrades, and copy configurations and support files to remote hosts. Use the ssh host-key
command to establish trust relationships with the SSH servers the sensor will contact.
You can manage the list of TLS trusted certificates and SSH known hosts through the commands service
trusted-certificates and service ssh-known-hosts.
X.509 certificates include additional information that can increase the security of the trust relationship;
however, these can lead to confusion. For example, an X.509 certificate includes a validity period during
which the certificate can be trusted. Typically this period is a number of years starting at the moment the
certificate is created. To ensure that an X.509 certificate is valid at the moment it is being used requires
that the client system maintain an accurate clock.
X.509 certificates are also tied to a particular network address. Sensors fill this field with the IP address
of the command and control interface of the sensor. Consequently, if you change the command and
control IP address of the sensor, the X.509 certificate of the server is regenerated. You must reconfigure
all clients on the network that trusted the old certificate to locate the sensor at its new IP address and
trust the new certificate.
By using the SSH known hosts and TLS trusted certificates services in the AuthenticationApp, you can
operate sensors at a high level of security.