


22-20
Cisco Intrusion Prevention System CLI Sensor Configuration Guide for IPS 7.1
OL-19892-01
Chapter 22 Upgrading, Downgrading, and Installing System Images
Installing System Images
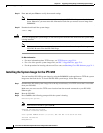
Step 10 Download and install the system image.
rommon> tftp
Note The IPS 4260 reboots once during the reimaging process. Do not remove power from the
IPS 4260 during the update process or the upgrade can become corrupted.
For More Information
• For more information about TFTP servers, see TFTP Servers, page 22-14.
• For a list of the specific system image files, see IPS 7.1 Upgrade Files, page 22-4.
• For the procedure for locating software on Cisco.com, see Obtaining Cisco IPS Software, page 21-1.
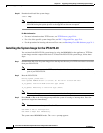
Installing the System Image for the IPS 4270-20
You can install the IPS 4270-20 system image by using the ROMMON on the appliance to TFTP the
system image onto the compact flash device. To install the IPS 4270-20 system image, follow these
steps:
Step 1 Download the IPS 4270-20 system image file to the tftp root directory of a TFTP server that is accessible
from your IPS 4270-20.
Note Make sure you can access the TFTP server location from the network connected to the Ethernet
port of your IPS 4270-20.
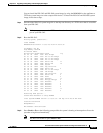
Step 2 Boot the IPS 4270-20.
Booting system, please wait...
Cisco Systems ROMMON Version (1.0(12)10) #7: Thu Jun 21 13:50:04 CDT 2007
ft_id_update: Invalid ID-PROM Controller Type (0x5df)
ft_id_update: Defaulting to Controller Type (0x5c2)
Note The controller type errors are a known issue and can be disregarded.
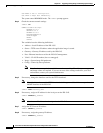
Step 3 Press Break or Esc at the following prompt while the system is booting to interrupt boot. Press the
spacebar to begin boot immediately.
Note You have ten seconds to press Break or Esc.
Use BREAK or ESC to interrupt boot.
Use SPACE to begin boot immediately.
The system enters ROMMON mode. The rommon> prompt appears.