


15-5
Cisco Intrusion Prevention System CLI Sensor Configuration Guide for IPS 7.1
OL-19892-01
Chapter 15 Configuring SNMP
Configuring SNMP Traps
–
trap-community-name—Specifies the community name used when sending the trap. If no
community name is specified the general trap community name is used.
–
trap-port—Specifies the port number to send the SNMP trap to.
Configuring SNMP Traps
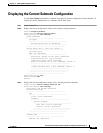
To configure SNMP traps, follow these steps:
Step 1 Log in to the CLI using an account with administrator privileges.
Step 2 Enter notification submode.
sensor# configure terminal
sensor(config)# service notification
sensor(config-not)#
Step 3 Enable SNMP traps.
sensor(config-not)# enable-notifications true
Step 4 Specify the parameters for the SNMP trap:
a. Specify the error events you want to be notified about through SNMP traps.
sensor(config-not)# error-filter {error | warning | fatal}
Note The error-filter [error | warning | fatal] command includes error, warning, and fatal traps.
It filters in (not filters out) the traps based on severity.
b. Specify whether you want detailed SNMP traps.
sensor(config-not)# enable-detail-traps true
c. Specify whether you want health traps (heartbeat and health metric change traps).
sensor(config-not)# enable-health-traps true
Note Make sure heartbeat and sensor health metrics are enabled.
d. Enter the community string to be included in the detailed traps.
sensor(config-not)# trap-community-name TRAP1
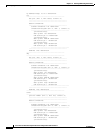
Step 5 Specify the parameters for the SNMP trap destinations so the sensor knows which management
workstations to send them to:
a. Enter the IP address of the SNMP management station.
sensor(config-not)# trap-destinations 10.0.0.0
b. Enter the UDP port of the SNMP management station. The default is 162
sensor(config-not-tra)# trap-port 162
c. Enter the trap community string.
sensor(config-not-tra)# trap-community-name AUSTIN_PUBLI