


22-29
Cisco Intrusion Prevention System CLI Sensor Configuration Guide for IPS 7.1
OL-19892-01
Chapter 22 Upgrading, Downgrading, and Installing System Images
Installing System Images
If the ASA 5500 AIP SSM suffers a failure and the module application image cannot run, you can
transfer application images from a TFTP server to the module using the adaptive security appliance CLI.
The adaptive security appliance can communicate with the module ROMMON application to transfer the
image.
To install the system image of the ASA 5500 AIP SSM, follow these steps:
Step 1 Download the system image file to the tftp root directory of a TFTP server that is accessible from your
adaptive security appliance.
Note Make sure you can access the TFTP server location from the network connected to the Ethernet
port of the adaptive security appliance.
Step 2 Log in to the adaptive security appliance.
Step 3 Enter enable mode.
asa# enable
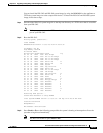
Step 4 Configure the recovery settings for the ASA 5500 AIP SSM.
asa (enable)# hw-module module 1 recover configure
Note If you make an error in the recovery configuration, use the hw-module module 1 recover stop
command to stop the system reimaging and then you can correct the configuration.
Step 5 Specify the TFTP URL for the system image.
Image URL [tftp://0.0.0.0/]:
Example
Image URL [tftp://0.0.0.0/]: tftp://192.0.2.0/IPS-SSP-K9-sys-1.1-a-7.1-2-E4.img
Step 6 Specify the command and control interface of the ASA 5500 AIP SSM.
Note The port IP address is the management IP address of the ASA 5500 AIP SSM.
Port IP Address [0.0.0.0]:
Example
Port IP Address [0.0.0.0]: 10.89.149.231
Step 7 Leave the VLAN ID at 0.
VLAN ID [0]:
Step 8 Specify the default gateway of the ASA 5500 AIP SSM.
Gateway IP Address [0.0.0.0]:
Example
Gateway IP Address [0.0.0.0]: 10.89.149.254