


22-22
Cisco Intrusion Prevention System CLI Sensor Configuration Guide for IPS 7.1
OL-19892-01
Chapter 22 Upgrading, Downgrading, and Installing System Images
Installing System Images
UNIX Example
rommon> IMAGE=/system_images/IPS-4270_20-K9-sys-1.1-a-7.1-3-E4.img
Note The path is relative to the UNIX TFTP server default tftpboot directory. Images located in the
default tftpboot directory do not have any directory names or slashes in the IMAGE
specification.
Windows Example
rommon> IMAGE=\system_images\IPS-4270_20-K9-sys-1.1-a-7.1-3-E4.img
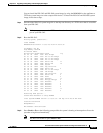
Step 10 Enter set and press Enter to verify the network settings.
Note You can use the sync command to store these settings in NVRAM so they are maintained across
boots. Otherwise, you must enter this information each time you want to boot an image from
ROMMON.
Step 11 Download and install the system image.
rommon> tftp
Caution To avoid corrupting the system image, do not remove power from the IPS 4270-20 while the system
image is being installed.
Note If the network settings are correct, the system downloads and boots the specified image on the
IPS 4270-20. Be sure to use the IPS 4270-20 image.
For More Information
• For more information about TFTP servers, see TFTP Servers, page 22-14.
• For a list of the specific system image files, see IPS 7.1 Upgrade Files, page 22-4.
• For the procedure for locating software on Cisco.com, see Obtaining Cisco IPS Software, page 21-1.
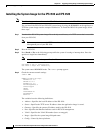
Installing the System Image for the IPS 4345 and IPS 4360
Note This procedure is for IPS 4345, but is also applicable to IPS 4360. The system image for IPS 4360 has
“4360” in the filename.