


22-17
Cisco Intrusion Prevention System CLI Sensor Configuration Guide for IPS 7.1
OL-19892-01
Chapter 22 Upgrading, Downgrading, and Installing System Images
Installing System Images
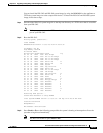
Note Not all values are required to establish network connectivity. The address, server, gateway, and
image values are required. If you are not sure of the settings needed for your local environment,
contact your system administrator.
Step 5 If necessary, change the interface used for the TFTP download.
Note The default interface used for TFTP downloads is Management 0/0, which corresponds to the
MGMT interface of the IPS 4240.
rommon> PORT=interface_name
Step 6 If necessary, assign an IP address for the local port on the IPS 4240.
rommon> ADDRESS=ip_address
Note Use the same IP address that is assigned to the IPS 4240.
Step 7 If necessary, assign the TFTP server IP address.
rommon> SERVER=ip_address
Step 8 If necessary, assign the gateway IP address.
rommon> GATEWAY=ip_address
Step 9 Verify that you have access to the TFTP server by pinging it from your local Ethernet port with one of
the following commands.
rommon> ping server_ip_address
rommon> ping server
Step 10 If necessary define the path and filename on the TFTP file server from which you are downloading the
image.
rommon> IMAGE=path/file_name
Caution Make sure that you enter the IMAGE command in all uppercase. You can enter the other ROMMON
commands in either lower case or upper case, but the IMAGE command specifically must be all
uppercase.
UNIX Example
rommon> IMAGE=/system_images/IPS-4240-K9-sys-1.1-a-7.0-4-E4.img
Note The path is relative to the default tftpboot directory of the UNIX TFTP server. Images located
in the default tftpboot directory do not have any directory names or slashes in the IMAGE
specification.
Windows Example
rommon> IMAGE=\system_images\IPS-4240-K9-sys-1.1-a-7.0-4-E4.img