


Firewall > Multicast
460
SonicOS Enhanced 4.0 Administrator Guide
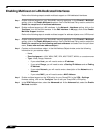
Enabling Multicast on LAN-Dedicated Interfaces
Perform the following steps to enable multicast support on LAN-dedicated interfaces.
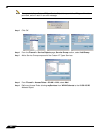
Step 1 Enable multicast support on your SonicWALL security appliance. In the Firewall > Multicast
setting, click on the Enable Multicast checkbox. And in the Multicast Policy section, select the
Enable the reception of all multicast addresses.
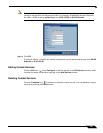
Step 2 Enable multicast support on LAN interfaces. In the Network > Interfaces setting, click on the
‘Configure’ icon for the LAN interface. In the Edit Interface - LAN page, click on the Enable
Multicast Support checkbox.
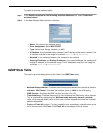
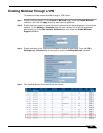
Perform the following steps to enable multicast support for address objects over a VPN tunnel.
Step 1 Enable multicast support on your SonicWALL security appliance. In the Firewall > Multicast
setting, click on the Enable Multicast checkbox. And in the Multicast Policy section, select the
Enable the reception for the following multicast addresses and select from the pull-down
menu, Create new multicast address object....
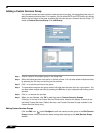
Step 2 Create a multicast address object. In the Add Address Object window, enter the following
information for your address object:
–
Name
–
Zone Assignment: <LAN, WAN, DMZ, VPN, MULTICAST, WLAN, or a custom zone>
–
Type: <Host, Range, Network>
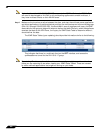
• If you select Host, you will need to enter an IP address.
• If you select Range, you will need to enter a Starting IP Address and an Ending
IP Address.
• If you select Network, you will need to enter a description of the Network and a
Netmask.
• If you select MAC, you will need to enter a MAC Address.
Step 3 Enable multicast support on the VPN policy for your GroupVPN. In the VPN > Settings
firmware setting, click on the “Configure’ icon to edit your GroupVPN’s VPN policy.
Step 4 In the VPN Policy window, select the Advanced tab. At the Advanced tab, select the Enable
Multicast checkbox.