


WEBVISION™
89 95-7769—01
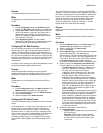
Procedure
1. Click the Custom Wiring button on the left pane to
open the Custom Wiring page.
2. You can choose to change the default assignment.
Select Custom option in the Assignment Type list.
3. Select Default to revert back to the default assignment.
4. The number of outputs available for changing the
configuration depends on the model type. For a
W7751B Smart, only 4 output pins would be enabled.
5. Click Commit to save the settings or Reset to revert to
the last saved settings.
6. Click Next to display the Wiring Diagram page or Back
to display the Miscellaneous Parameters page.
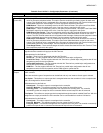
Excel 10 VAV II Custom Wiring Settings fields
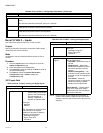
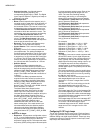
Excel 10 VAV II – Wiring Diagram
Purpose
Display the wiring diagram for the controller.
Mode
Configuration can be performed with the device Off-line or
On-line.
Procedure
1. Click the Wiring Diagram button on the left pane to
open the Wiring Diagram Configuration page.
2. Enter information into available fields.
3. Click Commit to save the settings or Reset to revert to
the last saved settings.
4. Click Back to display the Custom Wiring page.
NOTE: Fields appearing grayed out indicate those fields that
change based on the Model Type selected on the
Configuration page.
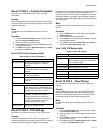
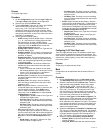
Configuring the Vacon NX Frequency
Converter (NXVFD)
VACON NX frequency converter (NXVFD) is an electronic
device for control of speed and torque of three-phase
alternating current (AC) motors. NXVFD converts the fixed
frequency and voltage of the main supply (mains) to a variable
frequency and voltage, which can then be regulated to provide
flexible motor operation and reduce energy consumption.
VACON NX frequency converters can be connected to the
LonWorks network using a field bus board.
The VACON NXOPTC4 option board is equipped with an
FTT-10A transceiver supporting the Free Topology
transformer coupled network, which allows the network wire to
be connected as bus, star, loop or combination of these. The
converter can then be controlled, monitored and programmed
from the Host system. The LonWorks board shall be installed
in slot E on the control board of the frequency converter. The
converter can then be controlled, monitored and programmed
from the LONWORKS network.
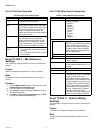
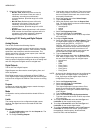
Configuring NXVFD settings
IMPORTANT NOTE:
After the option card is installed, it is mandatory to
make the following settings for Control Place and
Frequency Reference:
1. Selection of Control Place –
The NXVFD device can be controlled from three
different places. They are (default control place is Key
Pad [panel]):
• I/O terminal
• Key Pad (panel)
• Fieldbus
The Key Pad control of NXVFD device is used for
parameter setting, reading status data and giving control
commands.
The NXVFD has to be configured to select field bus as
control place before starting any of the operations
through the wizard. This configuration can be performed
using the Key Pad control provided along with device as
follows:
• In the keypad, from the main menu, select the menu
called Keypad Control.
• Select the submenu Control Place and set it to
FieldBus.
NOTE: None of the values sent (through fieldbus), by the
wizard will be considered until and unless the device
is configured with field bus as control place.
2. Selection of Frequency Reference –
The NXVFD can be configured to select the frequency
reference from following different sources:
•AI1
•AI2
• Keypad
• Fieldbus
• Configuring VFD NX Drive parameters
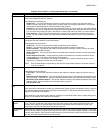
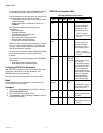
Table 68. VAV II Custom Wiring Settings.
Name Definition
Selected Outputs All configured outputs
Configured
Outputs
Terminal positions available for the
Selected Outputs.
Default
Assignments
This list is filled with the default
assignment as the user configures the
outputs in the General page.
New
Assignments
This list is by default filled with the same
options as Default Assignment. But, the
user has an option to change the outputs.
Existing
Assignments
This list is filled with the outputs
assignment in the controller. This list would
show the actual assignment in the device if
the device is online. If not, it would just
show the values from the database.
Output
Assignment
Choose one of the following options:
Default
Custom - Choose this option if you want to
over ride default assignments. This
enables the New Assignment column. The
number of output pins enabled depends on
the Model Type selected.