


WEBVISION™
19 95-7769—01
3. Click Download. The binding settings are downloaded
on the selected channel.
To upload device bindings:
1. Click Devices on the WebVision page. The Device
List page is displayed.
2. Click Device Binding. The Device Binding page is
displayed.
3. Click Upload. The binding settings are uploaded on the
selected channel.
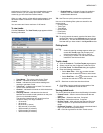
Point List
Point Group
Point groups are used for monitoring and diagnostics of
controllers. You can create a maximum of fifty point groups in
WebVision and add a maximum of fifty points to each point
group.
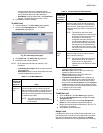
To view point groups:
1. Click the Devices tab. The Device List page appears.
2. Click the Point List tab. The Point List page appears
with points present in the first point group.
3. The list of points is displayed with the following
information in tabular format:
• Point Name – Indicates the name of the point.
• Device Name – Indicates the name of the device.
• Channel – Indicates the channel being used.
• Value – Indicates the value of the point. If the point
is read only point, it appears as a label. If the point is
writable point, it appears in a text box/select box
with a Write button against it.
• Write – Click Write to write a point value on a
controller.
To add a point group:
1. Click the Devices tab. The Device List page appears.
2. Click the Points tab. The Point List page appears.
3. Click Add Point Group. The Add Point page is
displayed.
4. Type the name of the point group in the Point Group
Name field.
5. All the points in that group are listed in a tabular format.
Click Add Point to add a point. A point selection dialog
comes up. Select a point and click OK to add the point
to the group.
6. Repeat step 5 to add all the required points to the
group.
7. Select the required points that you want to delete from
the Point List page.
8. Click Delete Point. A confirmation message appears.
9. Click Save to save settings.
NOTE: Click Cancel to abort the action.
TIP: You can create a maximum of fifty point groups in
WebVision and add a maximum of fifty points to each
point group.
To edit a point group:
1. Select a name of the point group that you want to edit in
the Point Groups drop-down list.
2. Click Edit Point Group. The selected details of the
Point Group are displayed. Follow the procedure as
explained in step 4 of “To add a point group:” and make
the required changes.
To delete a point group:
1. Click the Devices tab. The Device List page appears.
2. Click the Points tab. The Point List page appears.
3. Click Add Point Group. The Add Point page is
displayed.
4. Select a name of the point group that you want to delete
in the Point Groups drop-down list.
5. Click Delete Point Group. A confirmation message
appears.
6. Click Yes to delete the selected points.
NOTE: Click No to abort the action.
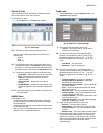
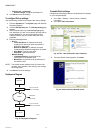
Device Configuration
This section describes how to view and setup a device
graphic and describes the configuration options.
To view device graphic:
1. On the left corner of the screen, WebVision is listed.
Expand WebVision to view all the devices associated
with it.
2. Select a device from the list of devices in WebVision.
Click the corresponding link to view the properties of
that device.
3. Click the Graphics tab. The View Graphics page
appears.
4. You can view the graphic linked to that device. All other
parameters, for example, Air Flow, Setpoint, Space (as
configured for the device) also appear on the screen.
To setup a graphic:
1. Select a device from the list of devices in WebVision.
Click the corresponding link to view the properties of
that device.
2. Click the Graphics tab. The View Graphics page
appears. Click Setup Graphic. The Setup Graphics
page appears.
3. You can add up to 3 links to the default graphic. The
links can point to another graphic or to an external Web
Site.
Configuration
The following options can be used for all the above mentioned
devices:
• Import Application – Use this option to restore the backed
up configuration.
• Export Application – Use this option to download
configuration settings.
• Reset – Use this option to reset the configuration settings
to the last saved configuration settings.
• Back – Use this option for navigation.
• Next – Use this option for navigation.