WEBVISION™
15 95-7769—01
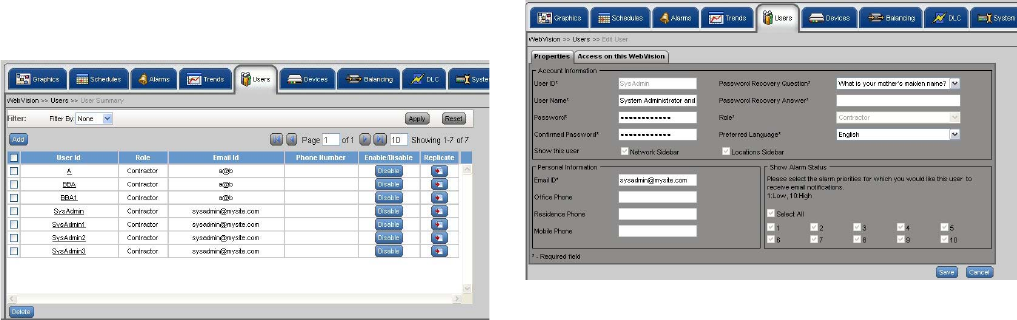
View list of Users
The list of users provides information on WebVision users
such as their names, roles, and e-mail IDs.
To view the list of users:
1. Click the Users tab. The Users page appears.
Fig. 21. Users page.
TIP: Use Filters to quickly search the required user.
Use one of the following filter options to search for the
required user:
•User ID
•Role
•Email ID
TIP: To quickly search the users, type the first letter of the
required filter criteria in the Keyword text box and type
an asterisk (*). This lists all the names starting with the
first letter that you have written in the Keyword text box.
2. The following information appears in a tabular format:
• User Name – Displays the name of the user name.
• Role – Displays the role assigned to the user.
• Email ID – Displays the user's e-mail ID for
communication.
• Phone Number – Displays the user's phone
number.
• Enable/Disable – Displays the user's status. Click
Enable to enable the user or Disable to disable the
user.
NOTE: Select the check box in the header row to select all
the users listed.
Add/Edit Users
While adding a user:
• Configure information related to User Name, Password,
Contact Information, and User Role Information through
the Properties tab.
• Assign Devices to the user being created using the Access
on this WebVision tab.
• Add new User only in the WebVision that is configured as
Network Server in networked WebVision.
To add a user:
1. On the Users page, click the Add User button. The
Properties page appears.
Fig. 22. Add User - Properties page.
2. Enter the account information of the user:
• User ID – The unique user ID. It must have a
minimum of 6 characters.
TIP: You can use a maximum of 30 characters and a
minimum of 6 characters to set your user ID. The
permitted characters include a-z, A-Z, _, 0-9. The
following characters are not allowed: !, @, #, $, %, ^, *, -
, and |.
• User Name – The user name.
• Password – Type your password.
TIP: You can use a maximum of 30 characters and a
minimum of 6 characters to set your password. The
permitted characters include a-z, A-Z, _, 0-9. The
following characters are not allowed: !, @, #, $, %, ^, *, -
, and |.
• Confirm Password – Retype your password.
• Password Recovery Question – Select the
Password Reminder Question.
• Password Recovery Answer – Type an answer for
the above question.
• Role – The role or designation of the user. Select
the role from the list.
• Show this user – The view authorized to the user.
• Network Sidebar – The user is authorized to view
only the network side bar view.
• Locations Sidebar – The user is authorized to view
only the locations view.
• Preferred Language – The user defined language.
Select the language from the list.
3. Enter the Personal Information of the user:
• Email ID – Type the user's e-mail ID.
• Office Phone – The user's office contact number.
• Residence Phone – The user's residence contact
number.
• Mobile Phone – The user's mobile contact number.
4. Set the Show Alarm Status. Select the alarm priorities
for which you want status update. The numbers are
listed from 1 through 10. The user can see only those
alarms whose corresponding priority is checked in this
step. Check Select All to view all the alarms
simultaneously.


