


WEBVISION™
25 95-7769—01
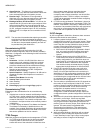
3. Choose US English or Metric as the standard for
setting the Engineering Units. All the point values in
the WebVision user interface are shown in the selected
unit.
4. For local weather, check the Enable check box. Select
a State and City from the corresponding lists.
5. Click Save to save the settings.
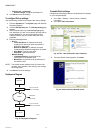
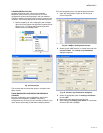
To configure Site setup:
Use the following procedure to configure the site setup:
1. Click the Systems tab. The System page with General
Properties appears.
2. Click the Site Setup tab. The Site Setup page appears.
3. Enter the following site details.
NOTE: Note: The supported background image formats
include: jpg, jpeg, and gif. The size of the image file
must not exceed 1MB.
• Contractor Details:
•Company Name
•Contractor Phone
• Contractor Website
• Contractor Email
• Company Logo: Click the Browse button to
browse for the site logo. Upload the selected
logo.
• Login Screen Image
• Image: Click the Browse button to browse for
the site image. Upload the selected image.
NOTE: Click Reset Image to restore the default image.
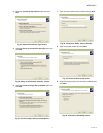
4. For outside air temperature, click Select Point and
select Channel, Device, and Point from the
corresponding list.
NOTE: Click Clear to clear the fields.
5. To provide weather conditions from an external link,
type the required URL and a Display Name for the link.
6. Click Save to save the settings.
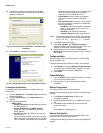
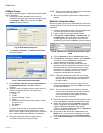
To configure Network setup:
Use the following procedure to configure the network setup:
1. Click the Systems tab. The System page with General
Properties appears.
2. Click Network Setup. The Network Setup page
appears.
3. Enter/select the following details:
• IP Settings:
• Host Name: Host Name is the name of the
WebVision on TCP/IP network. This name is
used to find WebVision on the network with the
help of the DNS server.
• Domain: Name of the domain in which
WebVision exists.
• DHCP: To assign IP addresses dynamically.
NOTE: Since the IP address changes frequently, it is not
possible to communicate with other WebVision
applications on the network.
• IP Settings: (continued)
• IP Address: A 32 bit address used to identify
WebVision on IP network. This address is
typically represented in dotted-decimal notation,
with the decimal value of each octet separated
by a period, for example, 192.168.0.1.
• HTTP Port: Enter the port number. The default
port number is 80. If the port number entered is
other than 80 then you must type the
application's URL followed by the port number.
For example, http://199.63.24.224:81.
• Network Mask: This is used to separate Network
Address and Host Address from IP Address in an
IP network. For example:
IP address - 192.168.1.100
Network Mask - 255.255.255.0
(IP Address) & (Network Mask) = Network
Address = 192.168.1.0
(IP Address) & (Network Mask)' = Host Address
= 0.0.0.100; where “&” is logic and operation and
“'” is the logic complement operation.
• Gateway IP Address: IP Address of a host that
is used as a gateway by WebVision to
communicate with hosts on other networks.
Typical scenario is when you connect to
WebVision using a host on a different network
using a browser.
• DNS1 Server Name: The IP Address of the host
on the network that WebVision uses to resolve
host name to IP Address or vice-versa. This
service is mainly utilized by WebVision for Mail
Notification and Internet Time Synchronization.
• DNS2 Server Name: The IP Address of the host
on the network that WebVision uses to resolve
host name to IP Address or vice-versa. This
service is mainly utilized by WebVision for Mail
Notification and Internet Time Synchronization.
• Mac ID: The unique hardware identification of a
network device.
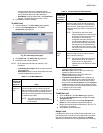
• Map Host Name to IP Address:
• Click Advance Settings. The Advance
Settings window appears.
•Type the Host Name. It is a unique name
given to a network equipment. You can
change it if required. The host name
corresponds to the MAC address.
•Type the IP Address. It is the numerical
address used to identify a device on a
network.
• Click OK. Each host Name is mapped to the
specified IP Address. You can use either to
access the device on the network.
• Channel Info:
• Channel Name: LonNetwork name used in the
WebVision.
• Domain ID: This is used to name a group of
devices connected to a LonNetwork. The
Domain ID must contain numbers form zero [0] to
nine [9] and must be in pairs. For example, if the
length of the Domain ID is configured as 3, then
the Domain ID is 12 34 56. There must be a
space between each pair.
• Subnet/Node ID: The Subnet represents a
LonNetwork and Node ID represents a controller
on that network. Here this Subnet/Node ID is
used to identify the LonNetwork of the
WebVision.