


7. System Setup
7.2 System setup sequence
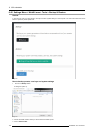
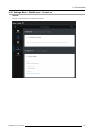
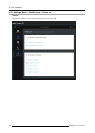
Set up from A to Z
This section pr ovides a top level view of the entire E 2 setup procedure, plus links to eac h individual sequence.
For the optimum E2 setup, it is recommended that you follow all procedures in the order outlined below.
Set up from A to Z
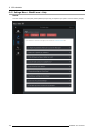
1. Power up and Status check. For more information see section "Power up and Status check", page 160.
2. Return to factory d efault. For more information see section"Return to factory default", page 161.
3. Commu nication setup allows setup to the Ethernet settings. For more information see section"Communication setup", page
162.
4. Restoring the system procedure restores the system to a previously saved configuration from a USB drive. For more information
see section "Restoring the system", page 163.
5. User preference setup is used to set a variety of important us er preferences. For more information see section " User preference
setup", page 164.
6. Saving the s etup procedure saves all system setup parameters. For more information see sec tion"Saving the setup", page 165.
7. Backing up the system procedure backs up your system configuration to a USB drive. For more information see section"Backing
up the system", page 166.
8. Configuring Menu > Initial Setup. For m ore information see section "Configuration Menu > Initial Setup ", page 167.
9. Configuring Menu > Add Background(s ). F or more information see section " Config
uration Menu > Add Background(s)", page
168.
10.Configuring Menu > Add Inputs. For m ore information see section "Con figuration Menu > Add Inputs", page 169.
11.Configur i ng Menu > Add Outputs . For more information see section "Configuration M enu > Add Outputs", page 170.
12.Configuring Men u > Add S creen Destinations & Layers. For more information see s ection "Configuration Menu > Add Screen
Destinations & Layers", page 171.
13.Configuring Menu > Add Aux Destinations. F or more information s ee section "Configuration M enu > Add Aux Destinations",
page 172.
14.Configuring Menu > Add MVR Outputs. For more information see section "Configuration Menu > A dd MVR Outputs", page
173.
15.Programming Menu > Select Thumbnails for Backgrounds. For more information see section "Programming M enu > Select
Thumbnails for Backgrounds", page 174.
16.Programming Menu > Select Thumbnails for Inputs. For more information see section "Programming Menu > Select Thumb-
nails for Inputs", page 175.
17.Pro gramm ing Menu > Create Sources from Inputs. For more information see section "Programming Menu > Create Sources
from Inputs", page 176.
18.Programming Menu > Drop backgrounds into Screen Destinations. For m ore information see section "P rogramming Menu
> Drop back grounds into S creen Destinations", page 177.
19.
Programm ing M enu > Drop Layers into Screen Destinations & So urces into layers. F or m ore information see section
"Programming Menu > Drop Layers into Screen Destinations & Sources into layers", page 178.
20.Programming Menu > Drop Inputs to Aux Destinations. For m ore information s ee section "Programm ing Menu > Drop Inputs
to Aux Destinations", page 180.
21.Mu ltiviewer Menu > Drop Inputs, Backgrounds and Destinations. For more information see s ection "Multiviewer Menu >
Drop Inputs, Backgrounds and Destinations ", page 181.
R5905948 E2 12/12/2014
159