EPA Calibration Protocol Teledyne API – Model T300/T300M CO Analyzer
234
10.1.4. CALIBRATION FREQUENCY
To ensure accurate measurements of the CO concentrations, calibrate the analyzer at the
time of installation, and recalibrate it:
No later than three months after the most recent calibration or performance audit
which indicate the analyzer’s calibration to be acceptable.
When there is an interruption of more than a few days in analyzer operation.
When any repairs have taken place which might affect its calibration.
After a physical relocation of the analyzer.
When any other indication (including excessive zero or span drift) of possible
significant inaccuracy of the analyzer exists.
Following any of the activities listed above, the zero and span should be checked to
determine if a calibration is necessary.
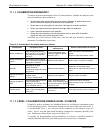
Table 10-2: Activity Matrix for Quality Assurance Checks
Characteristic Acceptance limits
Frequency and method of
measurement
Action if requirements are not met
Shelter temperature
Mean temperature between
22
o
C and 28
o
C (72
o
and 82
o
F),
daily fluctuations not greater
than ±2
o
C
Check thermograph chart
weekly for variations greater
than ±2
o
C (4
o
F)
Mark strip chart for the affected time
period
Repair or adjust temperature control
Sample introduction
system
No moisture, foreign material,
leaks, obstructions; sample line
connected to manifold
Weekly visual inspection Clean, repair, or replace as needed
Recorder
Adequate ink & paper
Legible ink traces
Correct chart speed and range
Correct time
Weekly visual inspection
Replenish ink and paper supply
Adjust time to agree with clock; note on
chart
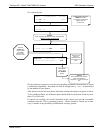
Analyzer operational
settings
TEST measurements at
nominal values
2. T300 in Sample Mode
Weekly visual inspection Adjust or repair as needed
Analyzer operational
check
Zero and span within tolerance
limits as described in
Subsection 9.1.3 of Sec. 2.0.9
(Q.A. Handbook Vol II
4
)
Level 1 zero/span every 2
weeks; Level 2 between Level
1 checks at frequency desired
analyzer by user
Find source of error and repair
After corrective action, re-calibrate
analyzer
Precision check
Assess precision as described
in Sec. 2.0.8 and Subsection
3.4.3 (Ibid.)
Every 2 weeks, Subsection
3.4.3 (Ibid.)
Calc, report precision, Sec. 2.0.8 (Ibid.)
.
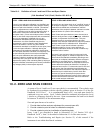
10.1.5. LEVEL 1 CALIBRATIONS VERSUS LEVEL 2 CHECKS
Essential to quality assurance are scheduled checks for verifying the operational status
of the monitoring system. The operator should visit the site at least once each week. It
is recommended Level 1 zero and span check conducted on the analyzer every two
weeks. Level 2 zero and span checks should be conducted at a frequency desired by the
user. Definitions of these terms are given in Table 10-3.
To provide for docum
entation and accountability of activities, a checklist should be
compiled and then filled out by the field operator as each activity is completed.
06864B DCN6314


