


5-32 Pelco Manual C501M-B (10/97)
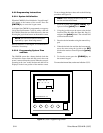
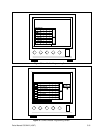
5.5.2.10 Programming Sequences
The CM8500 System is capable of storing 16 different
scanning sequences, with each sequence capable of
having 32 steps. Camera presets also can be pro-
grammed into the scanning sequence, if desired. When
defining a camera sequence, each camera selection must
contain a dwell time. Entering a dwell time of zero will
cause the specified camera to be bypassed in the scan-
ning sequence. To program a camera sequence, refer to
Figures 32 and 33 and the following instructions.
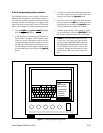
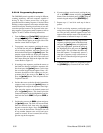
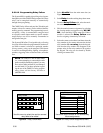
1. From the Seq menu, [js to Edit], highlight and
release the [point] button. The Sequence Descrip-
tion Table should appear on the right side of the
monitor screen. Refer to Figure 32.
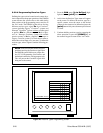
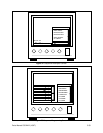
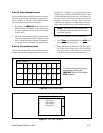
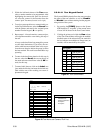
2. To program a new sequence, position the cursor
on a blank line and press the [point] button. To
edit an existing sequence, move the cursor to the
desired selection and press the [point] button. The
monitor screen should now display the Sequence
Definition Table on the left side of the screen and
the Camera Selection Table on the right side of the
screen. Refer to Figure 33.
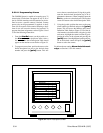
3. If creating a new sequence, position the cursor on
the blank line directly beneath the sequence title
block and press the [point] button. At this time
the on-screen keypad should appear. Enter a 20-
character description of the sequence to be pro-
grammed. Move the cursor to the Ent key and
press the [point] button. This will place the de-
scription in the box.
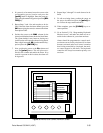
4. Position the cursor to the box directly beneath the
sequence name and press the [point] button to
highlight the first step in the sequence. Once high-
light, move the cursor to the desired camera and
press the [point] button. This should place the
camera description in the highlighted box and de-
fault both the dwell (DWL) and preset (PRE) to
zero.
5. Position the cursor to the DWL column and press
the [point] button. The field will become blank.
Enter the desired dwell time using the numeric
keypad to enter the digits. Press the [ENTER]
key to store the desired time. The dwell time can
be any number between zero and 99 and corre-
sponds to seconds. If zero is entered, this will by-
pass the step in the sequence.
6. If preset positions are to be used, position the cur-
sor to the PRE column and press the [point]
button. Enter the desired preset (1-32) using the
numeric keypad and press the [ENTER] key.
7. Repeat steps 4, 5 and 6 for each step in the se-
quence.
8. To edit an existing sequence, position the cursor
on the desired sequence and press the [point] but-
ton. The previously defined sequence screen will
appear on the monitor screen. Edit the table in the
same manner as indicated in steps 4, 5 and 6.
NOTE: To remove an existing step from the
sequence, position the cursor on the desired step
and press the [point] button to highlight the
step. Once highlighted, position the cursor on
the highlighted area and press the [point]
button again. This will delete the entire step
from the sequence. To temporarily remove a
step from a sequence, assign a dwell time of
zero. This will cause the step to be bypassed in
the sequence.
9. When the desired sequence is programmed, press
the [CLEAR] key to return to the “run” mode.