


Pelco Manual C501M-B (10/97) 5-7
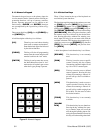
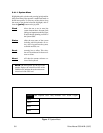
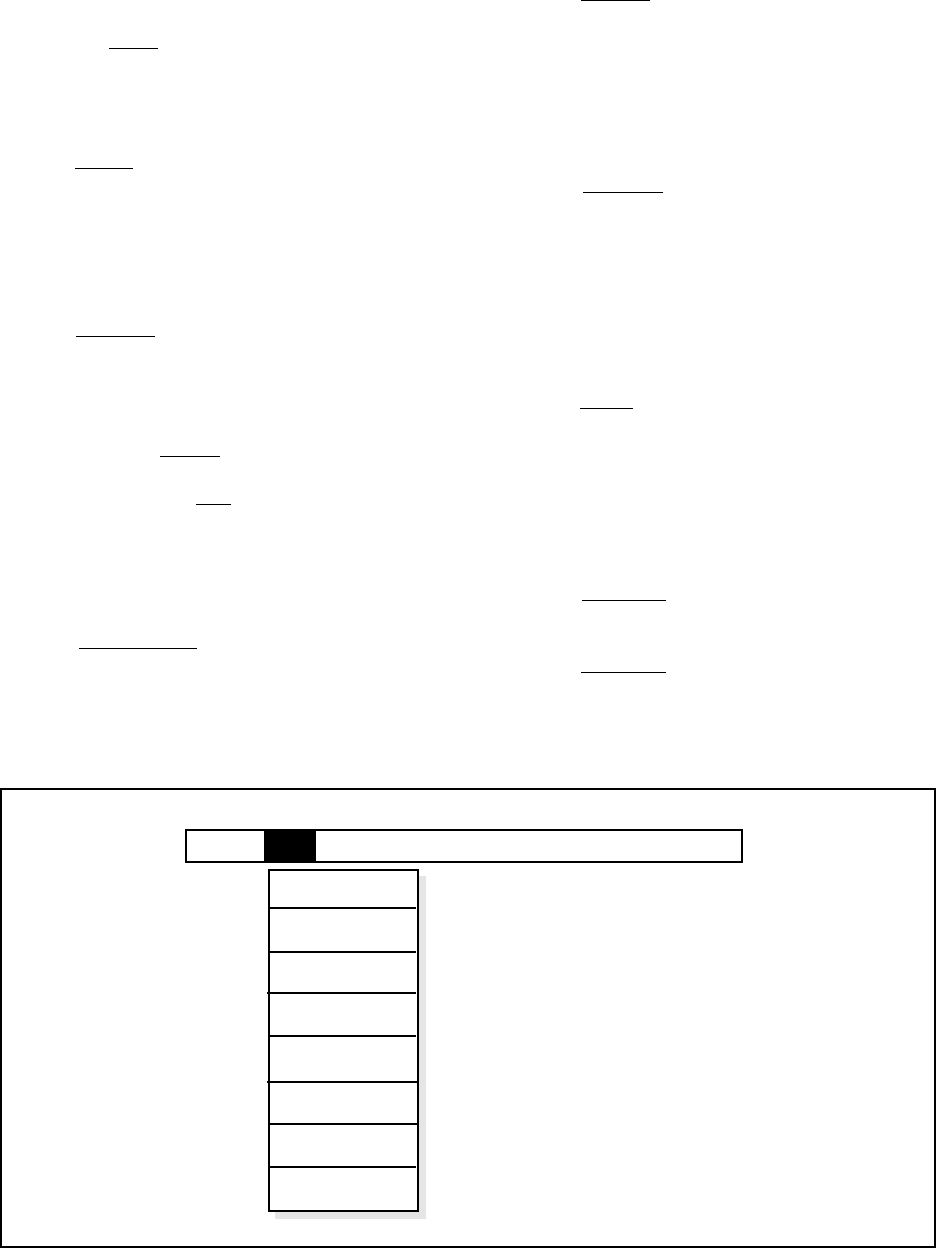
5.4.1.2 Cam Menu
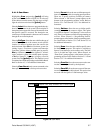
Highlighting Cam and pressing [point] will bring
up the camera menu. Refer to Figure 18. To select any
of the choices from this menu, drag the cursor to high-
light the selection and release the [point] button.
Selecting Label allows the user to program the descrip-
tions for each camera in the system. The description is
then placed in the upper-left corner of the monitor when
that specific camera is accessed. The description can
contain up to 20 alphanumeric characters and is entered
through the on-screen keyboard.
Selecting RxType allows the user to define the type of
receivers used by each of the cameras at each specific
location. To define a location, move the cursor to the
desired column. Select Cx for a Coaxitron
®
system (in-
cluding Legacy
®
Coaxitron
®
systems and Intercept
®
Coaxitron
®
systems without variable speed or presets),
Wx for a Wiretron system, Ic for a Spectra™, or Inter-
cept
®
Coaxitron
®
system with variable speed or presets,
or Is for a Spectra™, Intercept
®
or Legacy
®
two-wire
system. Press the [point] button. This function is used
in conjunction with the strap settings on the Buffer Board.
Refer to Section 4.3.3.2 for additional information.
Selecting Cam Reset sends a reset command to the
Intercept
®
dome currently called up on that monitor.
Selecting Preset allows the user to define preset posi-
tions on receivers capable of accepting preset positions.
There are 32 preset positions available per camera.
When selected, a “Set Presets” prompt appears at the
bottom of the programming monitor screen. Refer to
Section 5.5.1.4 and Section 5.5.2.5 for additional in-
formation.
Selecting Pattern allows the user to define specific
scanning patterns for the camera to follow. This option
is available on Spectra™ and Intercept
®
series receivers
only. There is one pattern available for programming per
receiver. When selected, a “Programming Pattern”
prompt appears at the bottom of the programming moni-
tor screen. Refer to Section 5.5.1.5 and Section 5.5.2.6
for additional information.
Selecting Zone allows the user to define specific zones
for identification purposes. This option is available on
Spectra™ and Intercept
®
series cameras only. The 360°
scan is divided into eight zones. When selected, an
“Enter Zone” prompt appears at the bottom of the pro-
gramming monitor screen. Refer to Section 5.5.1.6 and
Section 5.5.2.7 for additional information.
Selecting Cam On allows the user to turn on the cam-
era that is currently selected by the keyboard.
Selecting Cam Off allows the user to turn off the cam-
era currently selected by the keyboard. This option does
not work with the Spectra™ and Intercept
®
series.
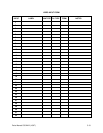
System Cam Keybrd User Seq AlrmRel Tour Event Logoff
Label
RxType
Preset
Pattern
Zone
Cam On
Cam Off
Cam Reset
Figure 18. Cam Menu