


5-30 Pelco Manual C501M-B (10/97)
5.5.2.9 Programming User Profiles
There are 16 different user profiles available for pro-
gramming. User profiles can be assigned to specific in-
dividuals or, if necessary, groups of individuals can
share the same user profile. Once a profile has been
created, the user has access to the system from any avail-
able keyboard.
The User Profile contains the following information:
the user’s personal identification number, the user’s pri-
ority level, what menus the user will have access to
(for programming purposes) and the cameras the user
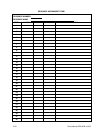
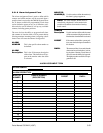
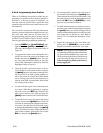
will have access to. Refer to Figures 30 and 31 and the
following procedure for programming instructions.
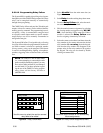
1. From the USER menu, [js to Profiles], high-
light and release the [point] button. The User Pro-
files table should appear on the screen. Refer to
Figure 30.
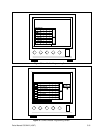
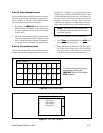
2. To program the camera access information for a
specific user, move the cursor to the desired user
number and press the [point] button. The cam-
era access table should now appear on top of the
User Profile Table and the selected user should be
highlighted. Refer to Figure 31.
3. Using the joystick, position the cursor to the de-
sired column for each camera location and press
the [point] button to activate the command. Plac-
ing an asterisk in the LOK column prohibits ac-
cess to the camera, an asterisk in the VID column
allows viewing of the camera only and placing an
asterisk in the POS column permits both control
and viewing of the camera.
4. Use the scroll bars to gain access to the other cam-
era screens. When the programming is complete,
move the cursor to the OK button located to the
right of the Camera Access Table and press the
[point] button to return to the User Profile Table.
5. To enter the user id, move the cursor to the desired
location and press the [point] button. This will
cause the on-screen keypad to appear on the moni-
tor screen. Using the joystick, position the cursor
on the desired number/letter and press the [point]
button. This field will accept a 5-digit alphanumeric
input. When complete, position the cursor on the
Ent key and press the [point] button.
6. To enter the priority number, move the cursor to
the desired location and press the [point] button.
When selected, the field will become blank. Using
the numeric keypad, enter the desired priority level
between 1-99 and press the [ENTER] key. Lead-
ing zeros may be omitted if desired.
7. To define what menus the user will have access to,
move the cursor to the desired description and press
the [point] button. An asterisk will appear in the
selected column defining the level of the user. Only
one column may be selected at a time. Refer to
Section 5.5.1.2 for additional information, if nec-
essary.
8. Repeat this procedure for each user. When com-
pleted, press the [CLEAR] key on the numeric
keypad to return the system to the “run” mode.
NOTE: When logging on to the CM8500 Ma-
trix with a high-priority password and then leav-
ing the keyboard unattended, the system can
still be accessed with all the privileges that are
associated with the high-priority password.
When leaving the keyboard, protect the sys-
tem by logging off.