


S-7200C
5. FUNCTION SETTINGS (G10 OPERATION PANEL)
56
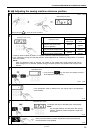
5-10. Adjusting the sewing machine reference position
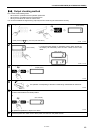
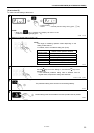
1
Change to sewing machine reference position adjustment mode
2
Select the adjustment item
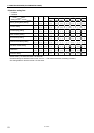
* “1 Sewing machine reference position” is adjusted at the time of shipment from the factory.
* If you would like to change only the stop positions, make adjustments at “2 Needle up stop position” or “3 Needle
down stop position”.
NOTE:
When an adjustment value is changed, the needle up and needle down signal positions will change.
Other settings such as solenoid operation timing and needle up/down stop positions will change in line
with this.
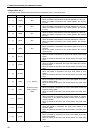
Display
Adjustment item
Adjustment
item name
Adjustment
value
1
Sewing machine reference
position (Adjustment when
motor is replaced)
[MORG]
-20-20
degrees
2
Needle up stop position
(during individual adjustment)
[UPOS]
-5-10
degrees
3
Needle down stop position
(during individual adjustment)
[DPOS]
-5-10
degrees
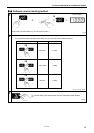
3
Change to the adjustment value display
4
Change the adjustment value
5
Confirm the adjustment value
6
The display will return to the setting item name display.
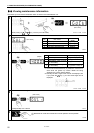
NOTE:
Any changed settings will take effect after sewing
machine reference position adjustment mode has
been exited.
If the adjustment value is different from the original value, the adjustment
value will flash.
* If you press the
key once more, the display will return
to the adjustment value display.
Sewing machine reference position adjustment mode will be exited and
normal operation will be possible.
4206M
(Adjustment item name)
(Adjustment value)
(Adjustment item name)
2088B 2138M
2089B
2090B 4161M
2091B
2092B
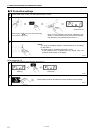
(While pressing the key, press the power ON switch.)
(Adjustment item name)