


S-7200C
10. ADJUSTMENTS
119
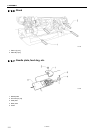
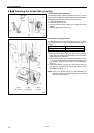
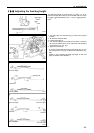
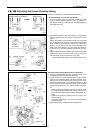
10-6. Quick reverse device
1. Turn the stitch length dial to the maximum setting.
2. Remove the side plate.
3. Tilt back the machine head.
4. Turn the stitch length dial to the maximum setting.
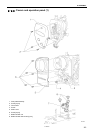
5. Loosen the two screws (1).
6. With the reverse lever (3) lowered as far as it will go, push
quick reverse solenoid (4) until the clearance between the
surface of the quick reverse solenoid (4) and the groove in
the plunger (5) is 3 mm.
7. Tighten the screws (1).
* If the clearance mentioned above is larger than 3 mm, the
operation of the quick reverse solenoid (4) will become stiff.
Furthermore, if the clearance is smaller than 3 mm, then
impact noise will easily occur when the quick reverse
solenoid (4) operates.
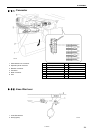
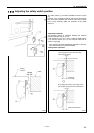
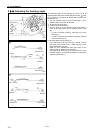
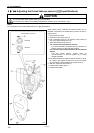
10-7. Matching the stitch lengths for forward feed and reverse feed
This matches the stitch lengths for forward feed and reverse
feed.
1. Turn the stitch length dial to “3”.
2. Sew at low speed (220 sti/min) in the forward and reverse
feed directions. (11 stitches in each direction)
3. If adjustment is necessary, carry out the following.
1) Tilt back the machine head.
2) Loosen the set screw (1).
3) Adjust by turning the eccentric pin (2) within a range
of 90°. (If the eccentric pin (2) is turned more than 90°,
the adjustment will be reversed.)
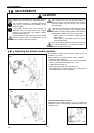
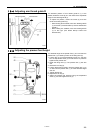
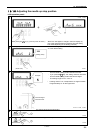
* If the stitch length is larger in the forward feed
direction than in the reverse feed direction, turn
the eccentric pin (2) in the clockwise direction.
* If the stitch length is smaller in the forward feed
direction than in the reverse feed direction, turn
the eccentric pin (2) in the counterclockwise
direction.
4. After adjusting, securely tighten the set screw (1).
4367M
4368M