


38 C1554M-A (4/05)
You can assign a preset in two ways:
• Save: By saving the preset. Saving a preset saves the camera position, focus setting, name, and script tag. Refer to Creating a Preset for
instructions on saving a preset to an unassigned preset number. Refer to Editing a Preset for instructions on saving a preset to a preset
number that is already assigned.
• Rename: By renaming the preset. Renaming a preset saves the name and script tag, but does not affect the camera position stored for the
preset. Refer to Renaming a Preset for information on renaming presets.
For information on presets defined in the camera, see the Pelco documentation for the appropriate camera model.
NOTE: Since presets are associated with a camera, rather than a user, any changes you make to a camera’s presets affect all users with
permission to access the presets.
Going to a Preset
To make a camera go to a preset, you must belong to, and log in under, a user group that allows you to control that camera.
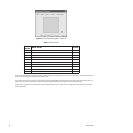
VMX300(-E) provides two methods of going to a preset:
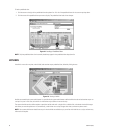
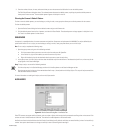
• Custom window: Select the preset you want the camera to go to from the presets drop-down list in the camera’s gadget. The presets
drop-down list only lists presets that have been assigned a name and script tag through the Presets tab. To go to an unassigned preset, use
the Presets tab in the Device Control dialog box.
• Device control dialog box: On the Presets tab for the desired camera, select the preset you want the camera to go to from the list and
click Goto.
Creating a Preset
Creating a preset refers to saving a preset to an unassigned preset number. For instructions on saving a preset to a preset number that has
previously been assigned, refer to Editing a Preset.
To create a preset for a Pelco PTZ camera, you must belong to, and log in under, a user group that allows you to edit the presets for that camera.
When you create a preset, it becomes available to all users who have permission to control the camera.
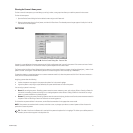
The Save option used to create a preset saves the camera position, preset name, and script tag. If a camera position is already stored for that
preset number, the stored camera position is replaced by the new one.
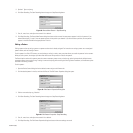
To determine whether an unassigned preset number has a camera position stored for it, select the preset in the Presets tab and click Goto. If the
camera moves as result, there is a camera position stored for the selected preset number. To assign a name and script tag while retaining the
stored camera position, use the Rename option described in Renaming a Preset.
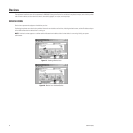
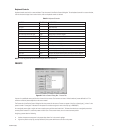
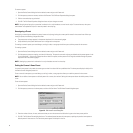
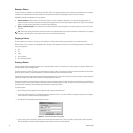
To create a preset:
1. Pan, tilt and zoom the camera until the desired view is showing.
2. Open the Device Control dialog box for the desired camera and go to the Presets tab.
3. You can click one of the unassigned preset numbers (Unassigned_i) or, if you do not select an unassigned number, the new preset will be
created in the next available unassigned position. Note: Selecting a preset that is already assigned is discussed in Editing a Preset.
4. Click Save. The Add New Preset dialog box opens.
TIP: The order of the list on the Presets tab is retained in the presets drop-down list in the gadget. This allows you to define presets in the
order you want them to appear in the drop-down list.
TIP: Use the Goto option on the Presets tab to test whether an unassigned preset has a camera position associated with it, by selecting
the preset and clicking Goto. If the camera moves, there is a stored camera position.