


162 Removing and Replacing Drive Modules Chapter 5
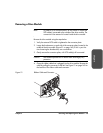
Removing and Replacing Drive Modules
This section explains how to replace a drive module in the following situations:
■ The library is powered off.
■ The library is powered on. If the library needs to remain powered on
when you are placing the drive, you need to check that the backup
software supports this.
Unloading a Tape from a Drive
Before replacing a drive, unload any tape from the drive (if applicable).
1. From the Drive and Tape Operations menu, select Unload Tape from Drive.
2. Use the [-] or [+] keys to select the drive you want to unload.
3. Select [Unload] to move the tape from the drive module to the original slot
where the tape was located. The tape is automatically rewound before it is
unloaded.
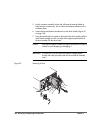
Taking a Drive Offline (for on-line drive replacement only)
Although a drive module can be removed without powering off the library, you
must first take the drive module offline. This process may be accomplished by
using the library’s front panel and following these steps:
1. Check the drive icons on the front panel display to see if the drive has
already been taken offline. Verify the drive module’s status by checking
the LEDs on the back of the drive module (Table 25 on page 138).
2. If the drive module is not already offline, go to the Administration and then
Online Drive Repair menus.
3. Select the drive with the [-] or [+] keys, and press [OK].
4. Select [Put Drive Offline]. The front panel indicates the success or failure of
this operation. When the drive module has been successfully taken offline,
one of the LEDs on the back of the drive will be flashing yellow.