


Setup Synthesizer Parameters
6.
On the synthesizer, press (PRESET).
7.
FREQUENCY
ISTART)
@
LGHz),
LSTOP)
0
@
LGHz).
8.
(POWER LEVEL) (TJ
m.
Access User Flatness Correction Menu
9.
10.
11.
12
13
14.
Press POWER
[MENU).
Select
Fitness
Menu.
Select Delete Menu Delete All . This step insures that the
flatness array is empty.
Press
(6%).
Leave the delete menu and return to the previous
soft key menu.
Enter the frequency points at which the correction information
will be taken. Choose either the point-by-point entry method
Enter Freq or the automatic frequency point generation
Auto Fill Start.
For this example,select
Auto Fill Start
@IGHz).
Select Auto Fill Stop
a@=,
Auto Fill
Incr
a[GHz).
Notice that a frequency list starting at 4 and ending at 10 GHz
with an increment value of 1 GHz is created.
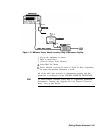
Enter Correction Data into Array
Select
Mtr
Meas
Menu Measure
Cars
All.
The power meter
is now under synthesizer control and is performing the sequence
of steps necessary to generate the correction information at each
frequency point.
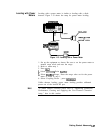
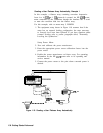
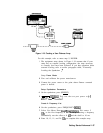
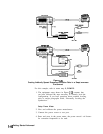
If an HP-IB error message is displayed verify that the interface
connections are correct. Check the HP-IB address of the power
meter and ensure that it is the same address the synthesizer is
using (address 13 is assumed). Refer to the menu map 8, System,
for the key sequence necessary to reach softkey Meter Adrs .
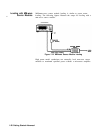
Enable User Flatness Correction
15.
When the operation is complete, (a message is displayed) the
flatness correction array is ready to be applied to your setup.
Disconnect the power meter/sensor and press [FLTNESS
ON/OFF)
(amber LED on). The power produced at the point where the
power meter/sensor was disconnected is now calibrated at the
frequencies and power level specified above.
Getting Started Advanced
l-35