


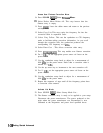
Optimizing
Synthesizer
Performance
Creating and Applying
The following examples demonstrate the user flatness correction
the User Flatness
feature:
Correction Array
1. Using an HP
437B
power meter to automatically enter correction
data for a swept 4 to 10 GHz measurement.
2. Manually entering correction data for a stepped (List Mode)
measurement.
3. Making swept mm-wave measurements, automatically entering
correction data for an arbitrary list of correction frequencies.
4. Making scalar analysis measurements with automatically-entered
correction data that compensates for power variations at the
output of a directional bridge.
Each example illustrates how to set up correction tables for a
different measurement requirement. Modify the instrument setups
shown to suit your particular needs. Completed correction tables
may be easily edited if more correction data is required for your
measurement. Additional correction frequencies may be added
by using the auto fill feature or by entering correction frequencies
individually. The auto fill feature adds but does not delete correction
frequencies.
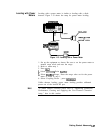
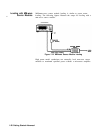
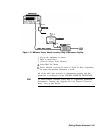
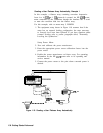
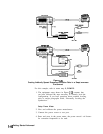
There are two basic front-panel methods of creating a flatness
correction array. The first and quickest method is to use an HP
437B
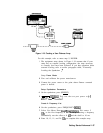
power meter. Refer to Figure 1-18 for the setup. The second method
is just as accurate, but requires a little more interaction between the
operator and the instruments. Figure 1-19 shows the setup for the
second method.
Getting Started Advanced 1-33