


Heat & Glo • RED60 • 2159-900 Rev. R • 9/12 83
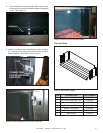
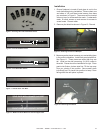
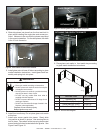
Figure7.FasteningAngleTabstoSecureGraniteinPlace.
4. Slide side pieces into place from the front and hold in
place while installing the angle tabs and screws pro-
vided. Measure to be sure that the pieces are placed
in the correct orientation. For the side pieces, the width
is the 10 inch dimension.
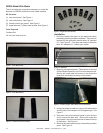
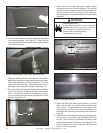
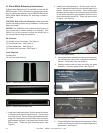
5. Install glass rocks in base of rebox according to glass
media installation instructions. Install glass frame as-
sembly and spring lock into place.
Figure8.ViewofBackandSidePieceInstalled.
10IN.
6. Install front media tray. Do not place glass rock media
at this time.
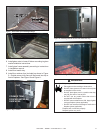
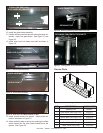
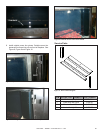
7. Install outer corner granite trim pieces. Slowly slide
into position as shown in picture. Use securing tabs to
hold in place. Tabs attach at the top using sheet metal
screws and pilot holes located above the granite. See
Figure 9 and Figure 10.
WARNING
Delayed Ignition Risk
• Place rock media according to instructions.
• Do NOT place rock media in area in front of pilot
or between burner tracks.
• Do NOT place rock media in a position that they
may fall into area in front of pilot.
• Do NOT use any media other than what is
supplied with this replace.
• Do NOT use more than three 10 lb. bags of rock
media per replace.
• Do NOT use more than ve bags of media in the
replace (when applicable).
Fireplace will not function properly.
Delayed ignition may occur.
GLASSFRAMETAB
RETAININGTABCONTACTSGRANITE
Figure10.PlacingOuterCornerGraniteTrimPiece.
Figure9.AttachingRetainingTabtoGlassFrameTab.
RETAININGTAB
8. Place glass rock media in front media tray according
to glass media installation instructions.
1
2
3
3
3
2
1
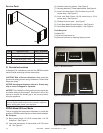
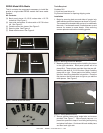
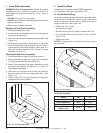
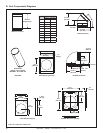
ITEM DESCRIPTION PARTNUMBER
Refractory Kit
GR60-L
1
Side Panel (Qty 2 req)
2159-211
2
Panel Side (Qty 2 req)
2159-210
3
Back Panel (Qty 3 req)
2159-209
Figure11.ServicePartsDiagram.