


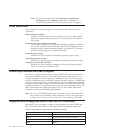


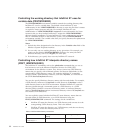

Return codes from the pdxtsetdest command
Return codes from the pdxtsetdest command are:
0 The command successfully updated the specified actual
destinations.
EINVAL An error exists with one of the command options.
E2BIG You specified an actual destination name that was too long.
ENOATTR You specified a command option without a value.
ENOENT You did not specify an actual destination name.
other Any other return codes that are not in this list are return codes
from C functions. See “Return code numbers” on page 113 for
explanations.
+ — — — — — – — End of Programming Interface information — — — — — - — +
Adding Windows user account names for InfoPrint Manager
security
InfoPrint Manager uses Access Control Lists (ACLs) to protect your printing
system by restricting the level of access that a user or a group of users has to
certain operations. Although InfoPrint XT has no specific security requirements,
you must complete certain InfoPrint Manager security tasks. At a minimum, the
user account name that you use in combined InfoPrint Manager and InfoPrint XT
installations must be a member of the InfoPrint Manager admin group. For
information about managing security, see InfoPrint Manager for Windows: Procedures,
G544-5814.
Note: You can check the InfoPrint Manager status of a specific user account name
using the InfoPrint Manager Management Console.
Testing the InfoPrint XT installation
Test the InfoPrint XT installation before you begin processing Xerox jobs through
InfoPrint XT. There are two methods of processing an InfoPrint XT-supplied test
job. The method to use depends on whether InfoPrint Manager is also installed. If
you have a combined InfoPrint XT and InfoPrint Manager installation, see “Testing
with InfoPrint Manager” on page 17.
Testing with the pdxtloadres and pdxtx2afp commands
InfoPrint XT provides a small Xerox test job and the Xerox resources that it
requires in the %PDXTINSTDIR%\testjob directory. Use the InfoPrint XT
pdxtloadres command to load the resources and the pdxtx2afp command to
process the test job.
To test the InfoPrint XT installation:
1. Access a Windows Command Prompt window.
2. Make the directory that contains the test job the current directory. From the
command line, enter:
cd %PDXTINSTDIR%\testjob
3. Load the resources for the test job:
pdxtloadres -n "*" -g pdxttest
16 InfoPrint XT Guide