


TROUBLESHOOTING
352
Fabric puckers There is a mistake in the upper or bobbin
threading.
Check the steps for threading the machine
and rethread it correctly.
54, 57
Using improper needle or thread for the
selected fabric.
Check the “Fabric/Thread/Needle
Combination” chart.
69
Thread tension is set incorrectly. Adjust the thread tension. 79, 233
Stitches are too long when sewing thin fabrics. Shorten the stitch length. 79
Needle is turned, bent or the point is dull. Replace the needle. 67
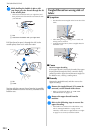
Spool cap is set incorrectly. Check the method for attaching the spool cap,
then reattach the spool cap.
57
Wrong presser foot. Use the correct presser foot. “STITCH SETTING
CHART”
High-pitched sound
while sewing
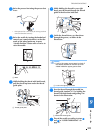
Dust or lint is caught in the feed dogs. Remove the dust or lint. 338
Pieces of thread are caught in the race. Clean the race. 338
Upper threading is incorrect. Check the steps for threading the machine
and rethread the machine.
57
There are scratches on the race. Replace the race, or consult your authorized
dealer.
338
A bobbin designed specifically for this machine
is not used.
Incorrect bobbins will not work properly. Only
use a bobbin designed specifically for this
machine.
54
Character pattern
does not turn out
Wrong presser foot was used. Attach the correct presser foot. “STITCH SETTING
CHART”
Pattern adjustment settings were set incorrectly. Revise the pattern adjustment settings. 162
Did not use a stabilizer material on thin fabrics
or stretch fabrics.
Attach a stabilizer material. 161
Thread tension is set incorrectly. Adjust the thread tension. 79, 233
Fabric was pulled, pushed or fed at an angle
while it was being sewn.
Sew while guiding the fabric with your hands
so that the fabric is fed in a straight line.
72
Embroidery pattern
does not sew out
correctly
Thread is twisted. Use scissors, etc., to cut the twisted thread
and remove it from the race, etc.
—
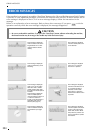
Fabric was not inserted into the frame correctly
(fabric was loose, etc.).
If the fabric is not stretched tight in the frame,
the pattern may turn out poorly or there may
be shrinkage of the pattern. Set the fabric into
the frame correctly.
203
Stabilizing material was not attached. Always use stabilizing material, especially
with stretch fabrics, lightweight fabrics, fabrics
with a coarse weave, or fabrics that often
cause pattern shrinkage. See your authorized
dealer for the proper stabilizer.
200
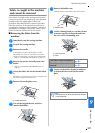
There was an object placed near the machine,
and the carriage or embroidery frame hit the
object during sewing.
If the frame bumps something during sewing,
the pattern will turn out poorly. Do not place
anything in the area where the frame may
bump it during sewing.
218
Fabric outside the frame edges interferes with
the sewing arm, so the embroidery unit cannot
move.
Reinsert the fabric in the embroidery frame so
that the excess fabric is away from the sewing
arm, and rotate the pattern 180 degrees.
203
Fabric is too heavy, so the embroidery unit
cannot move freely.
Place a large thick book or similar object
under the arm head to lightly lift the heavy
side and keep it level.
—
Fabric is hanging off the table. If the fabric is hanging off the table during
embroidery, the embroidery unit will not move
freely. Place the fabric so that it does not hang
off the table or hold the fabric to keep it from
dragging.
218
Fabric is snagged or caught on something. Stop the machine and place the fabric so that
it does not get caught or snagged.
—
Embroidery frame was removed during sewing
(for example, to reset the bobbin). The presser
foot was bumped or moved while removing or
attaching the embroidery frame, or the
embroidery unit was moved.
If the presser foot is bumped or the
embroidery unit is moved during sewing, the
pattern will not turn out. Be careful when
removing or reattaching the embroidery frame
during sewing.
229
St
abilizer is incorrectly attached, for example, it
is smaller than the embroidery frame.
Attach the stabilizer correctly. 200
Problem Cause Solution Page