


Chapter 5
Embroidery
BEFORE EMBROIDERING..................................... 186
Embroidery Step by Step.........................................................186
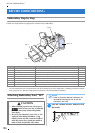
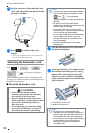
Attaching Embroidery Foot “W2”...........................................186
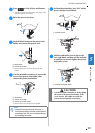
Attaching the Embroidery Unit...............................................188
■ About the Embroidery Unit............................................................. 188
■ Removing the Embroidery Unit.......................................................189
SELECTING PATTERNS.......................................... 190
■ Copyright Information.....................................................................190
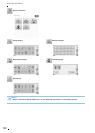
■ Pattern Selection Screens................................................................191
Selecting Embroidery Patterns/Brother “Exclusives”/Greek
Alphabet Patterns/Floral Alphabet Patterns/Utility Embroidery
Patterns...................................................................................193
Selecting Alphabet Character Patterns....................................194
Selecting Frame Patterns.........................................................196
Selecting Patterns from Embroidery Cards..............................197
■ About Embroidery Card Reader (Sold Separately) and
USB Card Writer Module*...............................................................197
■ About Embroidery Cards (Sold Separately)......................................197
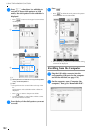
Selecting Patterns from USB Media/Computer .......................197
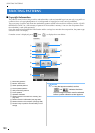
VIEWING THE SEWING SCREEN.......................... 198
■ Key Functions..................................................................................199
PREPARING THE FABRIC...................................... 200
Attaching Iron-on Stabilizers (Backing) to the Fabric..............200
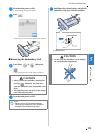
Hooping the Fabric in the Embroidery Frame .........................202
■ Types of Embroidery Frames ........................................................... 202
■ Inserting the Fabric.........................................................................203
■ Using the Embroidery Sheet............................................................204
Embroidering Small Fabrics or Fabric Edges............................205
■ Embroidering Small Fabrics............................................................. 205
■ Embroidering Edges or Corners....................................................... 205
■ Embroidering Ribbons or Tape........................................................205
ATTACHING THE EMBROIDERY FRAME.............. 206
■ Removing the Embroidery Frame.................................................... 207
CONFIRMING THE PATTERN POSITION............. 208
Aligning the Embroidering Position Using the Built-In Camera....... 208
Display the Fabric While Aligning the Embroidering Position.........211
■ Positioning the Pattern on Thick Fabric........................................... 213
Using the Built-In Camera to Align the Embroidering Position........213
Checking the Pattern Position.................................................216
Previewing the Completed Pattern..........................................217
SEWING AN EMBROIDERY PATTERN.................. 218
Sewing Attractive Finishes ......................................................218
■ Embroidery Needle Plate Cover......................................................219
Sewing Embroidery Patterns ...................................................219
Sewing Embroidery Patterns Which Use Appliqué..................221
PRINT AND STITCH (COMBINING EMBROIDERY
PATTERNS AND PRINTED DESIGNS)................... 223
Selecting a Pattern..................................................................224
■ Checking Only the Embroidery Pattern...........................................224
Outputting the Background Image and Positioning Image......225
■ Using USB Media............................................................................225
■ Using a USB Cable ..........................................................................226
Printing the Background and Embroidery Position Sheet ........226
Sewing Embroidery Patterns ...................................................227
ADJUSTMENTS DURING
THE EMBROIDERY PROCESS
.................................229
If the Bobbin Runs Out of Thread .......................................... 229
If the Thread Breaks During Sewing.......................................230
Restarting from the Beginning................................................231
Resuming Embroidery After Turning Off the Power............... 231
MAKING EMBROIDERY ADJUSTMENTS...............233
Adjusting Thread Tension....................................................... 233
■ Correct Thread Tension....................................................................233
■ Upper Thread is Too Tight...............................................................233
■ Upper Thread is Too Loose..............................................................234
Adjusting the Alternate Bobbin Case
(with No Color on the Screw) ................................................234
■ Correct Tension................................................................................234
■ Bobbin Thread is Too Loose.............................................................235
■ Bobbin Thread is Too Tight..............................................................235
Using the Automatic Thread Cutting Function
(END COLOR TRIM).............................................................. 235
Using the Thread Trimming Function (JUMP STITCH TRIM).. 236
■ Selecting the Length of Jump Stitch Not to Trim..............................236
Adjusting the Embroidery Speed............................................. 237
Changing the Thread Color Display........................................ 237
Changing the Embroidery Frame Display ...............................238
REVISING THE PATTERN.......................................240
Moving the Pattern................................................................. 240
Aligning the Pattern and the Needle....................................... 240
Changing the Size of the Pattern............................................ 241
Rotating the Pattern............................................................... 242
Creating a Horizontal Mirror Image....................................... 243
Changing the Density
(Alphabet Character and Frame Patterns Only)...................... 244
Changing the Colors of Alphabet Character Patterns............. 245
Embroidering Linked Characters ............................................245
Uninterrupted Embroidering (Using a Single Color)...............248
USING THE MEMORY FUNCTION .......................249
Embroidery Data Precautions................................................. 249
■ Types of Embroidery Data that can be Used....................................249
■ Types of USB Devices/Media that can be Used................................249
■ Computers and Operating Systems
with the Following Specifications can be Used................................250
■
Precautions on Using the Computer to Create and Save Data
...................250
■ Tajima (.dst) Embroidery Data .........................................................250
Saving Embroidery Patterns in the Machine’s Memory........... 251
■ If the Memory is Full........................................................................251
Saving Embroidery Patterns to USB Media............................. 252
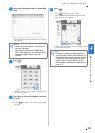
Saving Embroidery Patterns in the Computer......................... 253
Retrieving Patterns from the Machine’s Memory ...................254
Recalling from USB Media .....................................................255
Recalling from the Computer................................................. 256
EMBROIDERY APPLICATIONS..............................258
Using a Frame Pattern to Make an Appliqué (1).....................258
Using a Frame Pattern to Make an Appliqué (2).....................259
Sewing Split Embroidery Patterns........................................... 261
Some screen displays and illustrations may vary slightly with your machine. Refer to
Operation Manual Addendum for the detailed instructions.