


HELIX DN9848E Remote Control Software
User Guide
82
11 USING HELIX DN9848E RCS TO CONTROL A PROCESSING
SYSTEM
11.1 Overview
To control a system, the laptop/PC running HELIX DN9848E RCS is connected to one of the HELIX
DN9848E HELIX units. The laptop/PC then assumes control of the HELIX units’ system. The following
options for connecting the laptop/PC to the system are available:
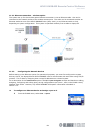
Ethernet: HELIX DN9848E units have a direct Ethernet LAN connection to the PC and can be
connected together using the unit’s two-port switch, or each one can be plugged into
an Ethernet switch or hub, all via their rear panel Ethernet sockets. The wireless
option offers increased flexibility during the event set-up, as the engineer can move
around freely with a laptop and adjust the equalisation while listening to the end
effect at any place in the venue.
Serial (option): The optional RS-232 serial connection is via the “PC PORT” on the front panel of the
first HELIX DN9848E unit. It is possible to connect to other HELIX DN9848E units
from the rear Ethernet port(s) when using a serial connection, but note that this will
be slower than using Ethernet.
The following sections describe how to connect the master HELIX DN9848E RCS laptop/PC to the system
for each option and also the interconnectivity of the HELIX DN9848E units.
11.2 HELIX DN9848E unit interconnections
The HELIX DN9848E units in your system can be interconnected via the units two-port switch, or each
one can be individually connected to an Ethernet switch or hub. For the connection of DN9848 units,
and also HELIX DN9340, DN9344, DN9340E and DN9344E units, refer to section 12.2.
Note When connecting the Ethernet cable to the rear panel of a HELIX DN9848E unit, either of the
Ethernet sockets can be used.
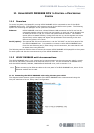
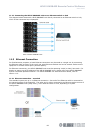
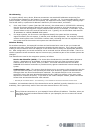
11.2.1 Connecting the HELIX DN9848E units using the two-port switch
The diagram below shows a typical example of the HELIX DN9848E units interconnected using the
two-port switches to form a “daisy-chain” configuration.