


HELIX DN9848E Remote Control Software
User Guide
56
6.2 Unit and Memory Identification
A single show file will usually have multiple HELIX Add-Ins equating to the physical HELIX DN9848E
units in your physical set up. Each Add-In is automatically given a unique address when it is added to
the HELIX DN9848E RCS. To make it easier to identify the Add-In in relation to its physical counterpart,
that is, the DN9848E HELIX unit that it will remotely program, you can rename each unit and change its
allocated number. You can also change the name of the unit’s memory, again for ease of identification.
All this is done in the DN9848 Units Home view.
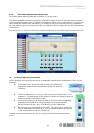
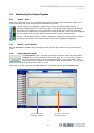
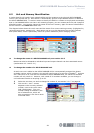
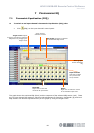
The diagram below shows the unit’s name and the name of its current working memory (highlighted by
red and orange boxes, respectively). Both names can be up to 24 characters long and are retained
after power down, which is particularly useful for system reassembly when changing venues.
To change the name of a HELIX DN9848E unit, see section 3.2.5
Names can also be allocated to individual input and output channels via their associated menus
(see Sections 4.3.1 and 5.3.1).
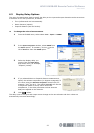
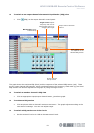
To change the number of a HELIX DN9848E unit
As each new unit is added to the HELIX DN9848E RCS it is automatically assigned the lowest
available number, which is shown in the top left-hand corner of its unit bar in FastNav
®
. As there
are a maximum of 16 units that can be added to HELIX DN9848E RCS, the maximum allocated
number will only reach 16. However, with a total of 32 numbers available, you can change a
unit’s allocated number to anything up to 32.
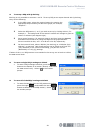
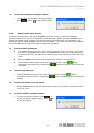
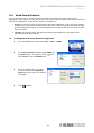
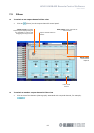
1 Select the unit that you wish to change the number of, see section 3.3.1“” on page 18.
2 Click on the and arrows
adjacent to the currently selected
number, next to the unit’s name
field (see diagram). This unit
number change is reflected in the
bar of selected unit, which will
alter its position in the list to retain
numerical order.