


6-14
C
HAPTER
6: C
ONFIGURING
THE
C
ORE
B
UILDER
7000 F
AMILY
ATM S
WITCH
LE Client Configuration Section This section prompts you for the
LAN Emulation Client configuration. You give names to the ELANs that
you want to be active in the network. In the Virtual Network
Configuration section, you will assign Ethernet ports to the ELANs you
have named in this section to create vLANs. Until then, the ELANs are
considered
potential
ELANs.
You can enter the names of resident ELANs of the switch you are setting
up and you can enter names of ELANs from other devices in the network.
You can define any number of potential ELANs. To end the sequence,
press Enter.
The names of the ELANs resident on a particular switch all have the form
elanXXXX_n
where “XXXX” is a number unique to the switch and “n” is
the sequential number of the ELAN. This is the form you need to use for
ELANs that you enter in this section (except for the admin ELAN).
You are first prompted for the name of the admin vLAN. The default
name displayed is the name of the admin vLAN of the CoreBuilder 7X00
which is installed in the highest occupied slot in the CoreBuilder chassis.
You can change it if you wish.
The name for the admin vLAN which is specified in this section will be
automatically chosen for the other modules housed in the same
CoreBuilder 7000 family ATM switch chassis, overriding any existing
admin vLAN names.
For this section and the Virtual Network Configuration section to operate
correctly, at least one CoreBuilder 7X00 interface card must be installed in
the CoreBuilder 7000 family ATM switch chassis.
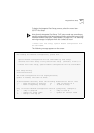
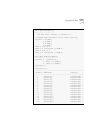
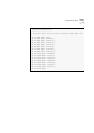
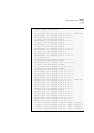
The following shows a typical LE Client Configuration section. Make a list
of the ELAN names and the numbers to which they are assigned in this
section. You will use it in the Virtual Network Configuration section.