


Chapter 3: Getting Started
11
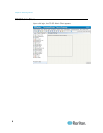
Date - click the drop-down arrow to select the Month, use the up
and down arrows to select the Year, and then click the Day in
the calendar area.
Time - use the up and down arrows to set the Hour, Minutes, and
Seconds, and then click the Time zone drop-down arrow to
select the time zone in which you are operating CC-SG.
a. To set the date and time via NTP: Select the Enable Network
Time Protocol checkbox at the bottom of the window, and then
type the IP addresses for the Primary NTP server and the
Secondary NTP server in the corresponding fields.
Note: Network Time Protocol (NTP) is the protocol used to
synchronize the attached computer's date and time data with a
referenced NTP server. When CC-SG is configured with NTP, it can
synchronize its clock time with the publicly available NTP reference
server to maintain correct and consistent time.
3. Click Update Configuration to apply the time and date changes to
CC-SG.
4. Click Refresh to reload the new server time in the Current Time field.
Choose System Maintenance > Restart to restart CC-SG.
Checking the Compatibility Matrix
The Compatibility Matrix lists the firmware versions of Raritan devices
and software versions of applications that are compatible with the current
version of CC-SG. CC-SG checks against this data when you add a
device, upgrade device firmware, or select an application for use. If the
firmware or software version is incompatible, CC-SG displays a message
to warn you before you continue. Each version of CC-SG will support
only the current and previous firmware versions for Raritan devices at
the time of release. You can view the compatibility matrix on the Raritan
Support web site.
To check the Compatibility Matrix:
• Choose Administration > Compatibility Matrix.
Checking and Upgrading Application Versions
Check and upgrade the CC-SG applications, including Raritan Console
(RC) and Raritan Remote Client (RRC).
To check an application version:
1. Choose Administration > Applications.