Network settings
Installing the software
Beabsolutelysuretoreadthroughthe“Readme.txt”ontheCD-ROM
suppliedwiththeunitfirstbeforeattemptingtoinstallthesoftware.
Software provided on the CD-ROM
zEasy IP Setup Software (EasyIPSetup.exe)
This software establishes the unit’s network settings.Fordetails,
refertothesectionsthatfollow.
Use the Easy IP Setup Software to establish the
unit’s settings
Thesettingsrelatedtotheunit’snetworkcanbeestablishedusingthe
EasyIPSetupSoftwaresupplied.
Toestablishthesettingsforamultiplenumberofunits,thesettingsmust
beselectedforeachcamerainvolved.
IfthesettingscannotbeestablishedusingtheEasyIPSetupSoftware,
selectthesettingsseparatelyfortheunitandpersonalcomputeronthe
networkpageofthesettingmenu.(→page@@)
<NOTE>
•If,afterthenetworksettingshavebeenestablished,anotherdevicein
thesamenetworkhasthesameIPaddress,thenetworkoperations
willnotbeperformedproperly.
SettheIPaddressinsuchawaythatitdoesnotduplicateanexisting
IPaddress.
•DonotestablishnetworksettingsfromamultiplenumberofEasyIP
SetupSoftwareprogramsatthesametimeforasinglecamera.
Similarly,donotperformthe“AutoIPsetting”operationofthe
AW-RP50remotecameracontrolleratthesametime.
TheIPaddresssettingsmaynolongerberecognizedasaresult.
•TheEasyIPSetupSoftwareisdesignedinsuchawaythatwhen
around20ormoreminuteshavepassedafterthepowerwasturned
on,theMACaddressandIPaddressofthetargetcamerawillno
longerbedisplayed.
→Fordetailsofthedisplaytimesetting,referto“EasyIPSetup
accommodateperiod”(→page@@).
•TheEasyIPSetupSoftwarecannotbeusedfromadifferentsubnet
viaarouter.
•Theunitcannotbedisplayedoritssettingsestablishedusinganolder
versionoftheEasyIPSetupSoftware(Ver.2.xx).
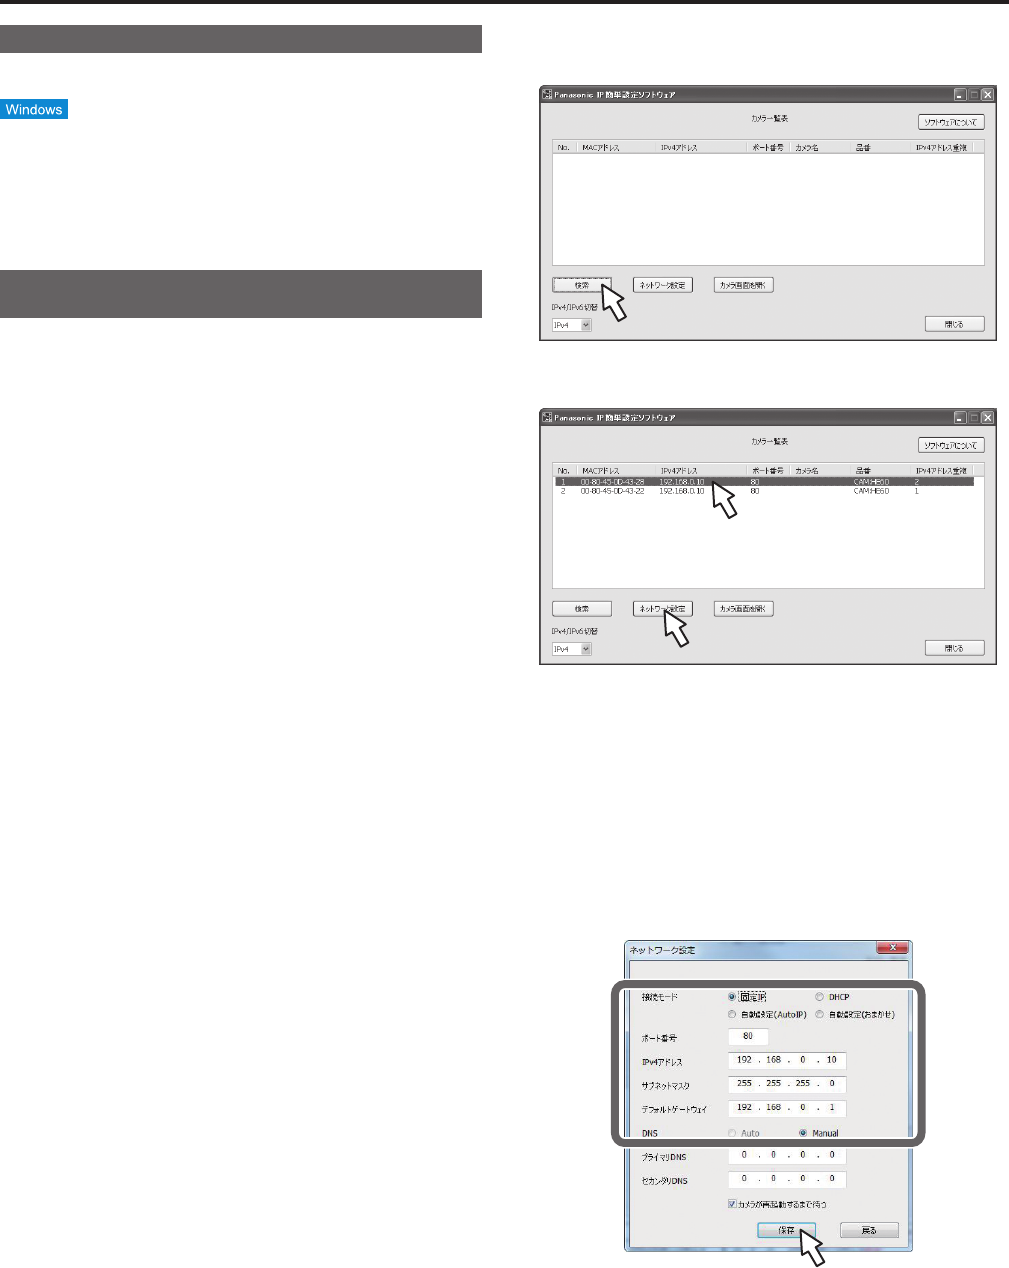
1. Start the Easy IP Setup Software.
2. Click the [Search] button.
3. Click the MAC address/IPv4 address of the camera to be
set, and click the [Network Settings] button.
<NOTE>
•WhenaDHCPserverisbeingused,theIPaddressallocatedtothe
unitcanbecheckedbyclickingthe[Search]buttonoftheEasyIP
SetupSoftware.
•IfthesameIPaddressisusedforanyadditionalcameras,the
numbersoftheadditionalcameraswillbedisplayedinthe“IPv4
overlap”columnofthecamerasconcerned.
•Whenthe[AccessCamera]buttonisclicked,theLivescreenofthe
selectedcameraisdisplayed.
•ThisunitdoesnotsupportanIPv4/IPv6switchingfunction.
4. Input the network items, and click the [Save] button.
<NOTE>
•WhenaDHCPserverisbeingused,“DNS”oftheEasyIPSetup
Softwarecanbesetto“Auto”.
•Afterthe[Save]buttonisclicked,ittakesabout2minutesforthe
settingsintheunittobecompleted.IftheACadaptororLANcableis
disconnectedbeforethesettingsarecompleted,thesettingswillbe
canceled.Inthiscase,repeatthestepstoestablishthesettings.
•Whenafirewall(includingsoftware)hasbeenintroduced,enable
accesstoalltheUDPports.
24


