


Crestron CLS-C6RF iLux
™
Integrated Lighting System w/infiNET
™
Setup High-End Levels (HE)
This option allows you to set the “full on” level of the lighting loads below their
maximum brightness. To set the high-end levels for the six lighting loads:
• Enter Setup mode and scroll to the “HE” option (using the ^ and v buttons). At
this point the lights will not change, but the bargraphs immediately indicate the
high-end levels for each lighting load. (In most cases this will be 100%, which is
indicated by all bargraph segments being on.)
• To set the high-end level, use the rocker button corresponding to that lighting
load to adjust it up or down. When the first adjustment is made, the light being
adjusted will jump to the current high-end level, and start adjusting from there.
As adjustments are made, the current light level for the lighting load being
adjusted should appear in the bargraph and the two-digit display.
• The high-end level cannot be adjusted below 67%.
• Note that for non-dim and “unused” lighting loads, the high-end level cannot be
adjusted (always at 100%). If you try to adjust this, the light and bargraph will
not change, and the two-digit display will show “Er” to indicate an error.
If setup is exited without pressing the Save button, the original values will be
retained. For lighting loads where adjustment has been made, lights will jump to the
original high-end level. Light levels will not change on lighting loads where no
adjustment was made. When the Save button is pressed, Setup mode will be exited,
the new values will be saved, and the lights will not change.
Setup Button Functions (bF)
This Setup mode is used to define the behavior of the buttons on the CLS-C6RF unit
itself, and on remote keypads if you want behavior other than the default. (Remote
keypads must be ID’d, using auto-discovery, prior to this, which will set them to
their default functions.) To enter this mode:
• First enter Setup mode and scroll to the “bF” option (using the ^ and v buttons).
Then use the up/down button to scroll through the available button functions and
values. This will scroll through all values for each function before proceeding to
the next function.
• If you press and hold the button, it will auto repeat. During auto-repeating, when
it reaches the minimum or maximum value for that function, it will stop. The
next button push will then increment/decrement to the next function.
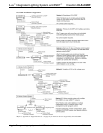
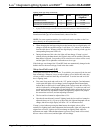
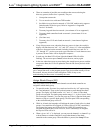
A available functions and values are as shown in the following table. (Other
functions require a PC with iLux Designer software to configure them.)
BUTTON FUNCTION CODE POSSIBLE VALUES
Recall Scene F1 oF,on,1-15
Toggle Scene F2 on,1-15
Control Shade (open/stop/close/stop) F3 AL, 1-6
Master Raise/Lower (last scene) F4 uP, dn, ud (rockers only)
1. To assign a function to a certain button or buttons, first scroll to the desired
function and value. Then, press each appropriate function button or remote
button to assign the displayed function and value to that button.
Operations Guide - DOC. 6418A iLux
™
Integrated Lighting System w/infiNET
™
: CLS-C6RF • 17