


iLux
™
Integrated Lighting System w/infiNET
™
Crestron CLS-C6RF
Configuring the CLS-C6RF
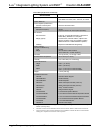
The overall configuration of the CLS-C6RF can be accomplished in two ways: using
the front panel controls, or using the supplied iLux
™
Designer application software,
which can be downloaded from the Crestron website.
Configuring via the front panel controls is not as extensive as what can be done using
the iLux Designer, but permits basic functional setup without having to use a PC.
In addition, some aspects of the CLS-C6’s operation can be modified only
via certain
Crestron Toolbox console commands. (Refer to “Console Command Settings” on
page 25 for details. Refer also to “Appendix B: Console Commands” on page 43 for
details on all applicable console commands.)
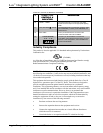
NOTE: Toolbox does not distinguish between the CLS-C6RF and CLSI-C6RF
devices. All report as CLS units.
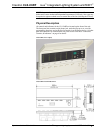
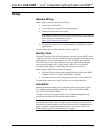
Configuring With Front Panel Controls
You can make temporary changes to accommodate a particular circumstance, or
change scene presets and replace the originals, as described below. To make more
extensive changes in the configuration of the CLS-C6RF without using the iLux
Designer software, use the Setup Mode, as described beginning on page 13.
Temporary Changes/Adjustments
Temporary changes/adjustments to the lighting levels or shade presets can be
accomplished as discussed in “Lights Mode” on page 36 and “Shades Mode” on
page 37.
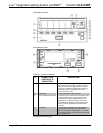
Changing Scene Presets
The CLS-C6RF scene settings can be modified via the front panel controls without
having to use a PC. Changes to the lighting load levels and shade presets for one or
more scenes can be accomplished as follows:
NOTE: The iLux Designer or SIMPL programs can lock a scene to prevent it from
being changed using the front panel controls. If the selected scene is “locked” in the
configuration, when you try to make any adjustment, “Er” will display for three
seconds, and the scene will remain in its existing state.
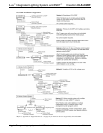
1. In Standard mode, press the function button of the scene you wish to
modify and hold it for five seconds. (Make sure you press the center of the
button so both sides make contact.)
2. The two-digit display will first count down as the lighting loads fade to their
preset levels for that scene; it will then begin flashing between Sc. and the
scene number; the Lights LED will be lit, and the Save and Cancel LEDs
will flash.
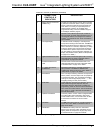
3. Use the six function buttons to adjust the levels of the lighting loads for that
scene. Press the left side of the buttons to lower the lighting loads; press the
right side of the buttons to raise the lighting loads.
• iLux
™
Integrated Lighting System w/infiNET
™
: CLS-C6RF Operations Guide - DOC. 6418A
12