


iLux
™
Integrated Lighting System w/infiNET
™
Crestron CLS-C6RF
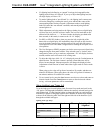
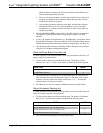
Lighting Load Type Setup (Continued)
Load Type Number LEDs Default LowEnd
/ HighEnd
Fluorescent (2-wire) 4 top 4 on 10 / 100
Non-dim (On at start/Off at start)¹ 5 top 5 on 0 / 100
Non-dim (On at end/Off at start)² 6 top 6 on 0 / 100
1. Whether going on or off, this load type will switch at the start of the fade.
2. If going off, this load type will switch at the start of the fade; if going on, it will switch at the end.
NOTE: When using an expansion module for dimmed loads, choose the
Incandescent load type; for non-dimmed loads, choose Non-dim.
NOTE: For some expansion modules, low-end levels can be set either on the iLux
unit or directly on the expansion module.
• When changing the load type using the rocker buttons, the two-digit display will
change to reflect the current load type. It will show “L#.” where # is the number
from the table above. Whenever the two-digit display is showing a load type, the
corresponding front panel LED is lit.
• During adjustment of this value, the lights will not change. If setup is exited
without pressing the Save button, the original values will be retained. When the
Save button is pressed, Setup mode will be exited, the new values will be saved,
and the lights will be updated to reflect the new curve type.
If the load type was changed, the LE and HE limits are automatically changed to the
default value for the new load type, listed in the above table.
Setup Low-End Levels (LE)
Some lights can flicker at very low levels. To avoid this, you can specify the low-end
limit accordingly. Whenever you try to adjust lights to a level below this value, they
will stay at the low-end limit until they are turned off. To set the low-end levels for
the six lighting loads:
• First enter Setup mode and scroll to the “LE” option (using the ^ and v buttons).
At this point the lights will not change, but the bargraphs should immediately
indicate the low-end levels for each lighting load. (In most cases this will be 0%,
which is indicated by all bargraph segments being off.) To set the low-end level,
use the rocker button corresponding to that lighting load to adjust the level up or
down. When the first adjustment is made, the light being adjusted will jump to
the current low-end level, and start adjusting from there.
• The low-end level cannot be adjusted above 33%.
• Note that for non-dim and “unused” lighting loads, the low-end level cannot be
adjusted (always at 0%). If you try to adjust this, the light and bargraph will not
change, and the two-digit display will show “Er.” to indicate an error.
If setup is exited without pressing the Save button, the original values will be
retained. For lighting loads where adjustment has been made, lights will jump to the
original low-end level. Light levels will not change on lighting loads where no
adjustment was made. When the Save button is pressed, Setup mode will be exited,
the new values will be saved, and the lights will not change.
• iLux
™
Integrated Lighting System w/infiNET
™
: CLS-C6RF Operations Guide - DOC. 6418A
16