


36
Utility
Stitches
Characters
and
Decorative
Stitches
Embroidering
Editing
Embroidery
Patterns
Retrieving
My
Custom
Stitch
TM
Maintenance
Error
Messages
Trouble
shooting
Sewing
Chart
Patterns
(Programmed
in Machine)
Patterns
(Memory
Card)
Sewing
Setting Up
1. SEWING CHAPTER 2
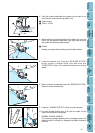
TRIAL SEWING
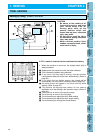
Sewing by using “UTILITY STITCH”
6
6*
5
4
1
3
2
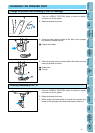
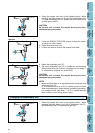
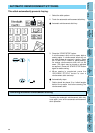
CAUTION
– Be aware of the needle at all
times while sewing, and keep
your hands away from all
moving parts such as the
needle, balance wheel and
thread take-up lever, otherwise
injury may result.
– Do not pull or push the fabric
too hard while sewing, otherwise
injury may result.
– Never use bent needles. Such
needles can easily break, which
could result in injury.
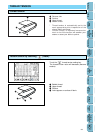
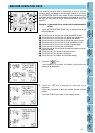
A 75/11 needle is inserted into the machine at the factory.
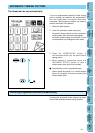
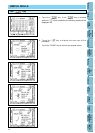
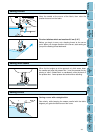
1. When the machine is turned on, the straight stitch (left) is
always selected.
1 Replace with the presser foot with the letter indicated.
2 This indicates the pattern being selected.
3 If you touch this key before sewing, reverse stitches
(reinforcement stitches) will be sewn automatically. (Refer to
page 38.)
4 If you touch this key before sewing, the thread will be
automatically cut at the finish of sewing. (Refer to page 39.)
5 An advice screen will appear if you touch this key while
sewing. (Refer to page 42.)
6 This selects the appropriate pattern for the sewing
application and also displays the operation steps. (Refer to
page 40.)
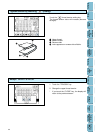
7 Touch this key to return to the previous page.
8 Touch this key to move to the next page.
9 Touch these keys to adjust the stitch width setting.
0 Touch these keys to adjust the stitch length setting.
A Touch these keys to change the thread tension.
9
0
A
1234
5
6
7
8