


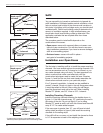

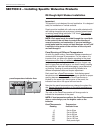

For installations that include soffit
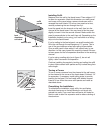
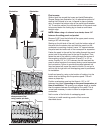
Nail undersill trim in place along the top of the fascia board.
Then nail F-channel along the bottom outside surface of the
fascia board (shown).
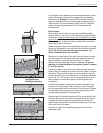
The fascia panel will have to be rip cut to fit over the fascia
board and F-channel. To determine the width of the panel,
measure from slot in undersill trim to bottom of F-channel.
Deduct 1/4" and cut (shown).
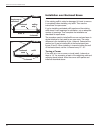
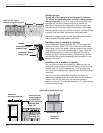
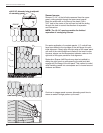
Use a snap lock punch to create tabs 1/8" below cut edge.
Punch tabs every 6", with tab raised on outside face of panel.
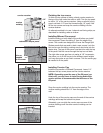
Install the panel by hooking the bottom of the fascia panel
under the F-channel and pushing the top into the undersill trim
(shown).
Continue to install the fascia as described on page 78.
Aluminum fascia
The techniques used to install aluminum fascia panels are
similar to those used with vinyl– with three exceptions. There
is no special undersill trim to use with aluminum fascia.
Aluminum fascia is made without nail slots, so you have to
pay attention to proper nailing techniques. And corners are
handled differently.
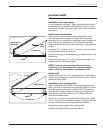
Install drip edge, gutter or all-purpose trim along the top of the
fascia board to receive the top edge of the fascia panel.
Slip the fascia panel in place, then nail the underside of the
panel. Nail every 24", keeping nails lined up with soffit
V-grooves.
For best appearance, first drill a slightly oversized hole. Nail
with painted trim nails, using a light touch.
At outside corners, bend a 1" flange at a 90 degree angle so
it turns the corner. Then cut the overlapping fascia at a 45
degree angle. Position panels and nail.
NOTE: If you need a piece of nonstandard size fascia,
use a portable brake to form it from aluminum trim sheet.
Install and nail using the same techniques used with
standard fascia panels.
6"
undersill
trim
fascia
board
F-channel
measure
minus 1/4"
1/8"
6"
snap lock
punch
79
Wolverine Fit and Finish Installation Guide