


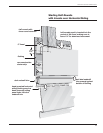
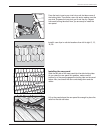
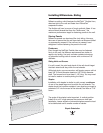
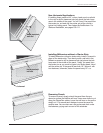

Install the next panel to the left of the installed panel. Lap this
panel over the installed panel, positioning the right edge of the
panel to a vertical “alignment mark” located in the factory
notch area (approximately 1" from the left, top edge) of the
installed panel.
Fasten the panel according to the procedure described earlier.
Continue the first course of siding.
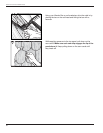
Start the next course of siding from the right side, repeating
the steps above. Remember, offset the laps from course to
course a minimum of two feet.
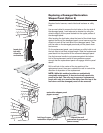
Installation procedure for a NON-fully nailable
substrate
Lock the right side panel into place on the starter strip. Allow
room for expansion and contraction in all accessory pockets:
• 1/4" if temperature is above 40° F.
• 3/8" if temperature is below 40° F.
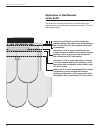
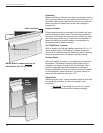
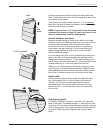
Locate the short, vertical slot on the nail hem (which indicates
the center of the panel). Locate the framing member (wall
stud) nearest the center of the panel and “center pin” the
panel into framing member using one of the following options:
a. If a nail slot is located over the framing member, install a
nail on both ends of the same nail slot.
b. Pin the panel by fastening directly through the nail hem.
c. Drill a 3/16" diameter hole through the nail hem and
framing member, and place a single fastener through this
newly drilled hole.
Install nails in the center of the remaining slots, 16" apart,
secured into a framing member. Leave enough room between
the fastener head and the nail flange for expansion and
contraction (approximately 1/16" to 1/8").
IMPORTANT: DO NOT HARD NAIL THESE FASTENERS.
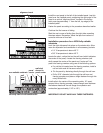
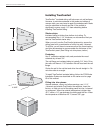
2' min.
cut away view of wall construction
wall
stud
non-nailable substrate
panel
center
wall stud
closest to
panel center
101
Wolverine Fit and Finish Installation Guide
alignment mark