


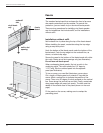


Fascia
The wooden fascia board that encloses the front of an eave
also needs protection from the weather. To provide this
protection, you can install vinyl or aluminum fascia panels.
There are two procedures for installing vinyl fascia panels–
one for installations that include soffit, one for installations
without soffit.
Installations without soffit
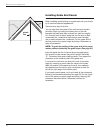
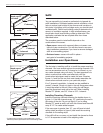
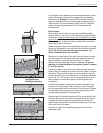
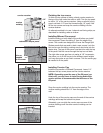
Nail undersill trim in place along the top of the fascia board.
Before installing the panel, create tabs along the top edge
using a snap lock punch.
Hook the bottom of the fascia panel under the bottom of the
fascia board. Push the top edge into the undersill trim, as
shown, or behind drip edge.
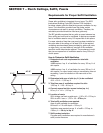
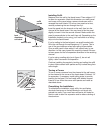
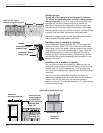
Secure the panel to the bottom of the fascia board with white
trim nails. Fasten at nail slot openings only (see illustration).
Do not face nail fascia panel.
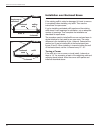
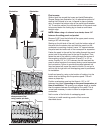
When overlapping fascia panels, first cut a notch in the
underlying panel. The notch should be 1/8" deep by
1-1/2" long. Slip the notched panel into the adjacent
panel (see illustration).
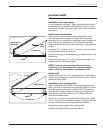
To turn a corner, you must first fabricate a corner piece.
Cut a length of fascia panel so it extends 6" beyond the
corner. Mark a vertical line to indicate the position of the
corner. Then cut a 90 degree V-notch centered on the vertical
line. Score along the vertical line and fold. Finally, create tabs
along upper edge with snap lock punch. The tabs must be
raised on the outside face of the panel (shown on the next
page).
Fit the panel on the corner, making sure to overlap the
preceding panel.
78
Wolverine Fit and Finish Installation Guide
undersill
trim
vinyl fascia
cap
fascia
board
nail in slot
opening
1/8"
3/4"
1-1/2"