


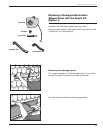
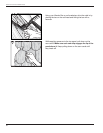
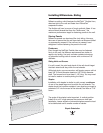
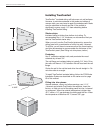

Install the next panel to the left of the installed panel. Lap this
panel over the installed panel, positioning the right edge of the
panel to the vertical “alignment mark” located in the factory
notch area (approximately 1" from the left, top edge) of the
installed panel.
Fasten the panel according the procedure described earlier
and continue the first course of siding.
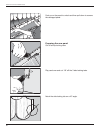
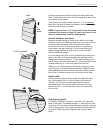
Start the next course of siding from the right side, repeating
the steps above. Remember, offset the laps from course to
course a minimum of 2 feet.
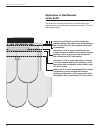
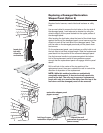
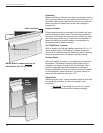
To finish the top course
Attach cornice receiver to the top of the wall under the eave or
soffit. Trim top panel to within 1/4" of cornice receiver. With a
nail slot punch, punch nail slots 16" apart, 1/4" from the
panel’s upper edge. Nail through the center of the holes for a
loose fit between panel surface and nail heads.
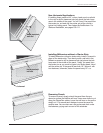
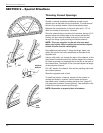
Install the cornice molding by snapping it into the cornice
receiver. To join two lengths of cornice molding, remove 1"
from the snap-in portion of the cornice molding. Be careful not
to remove material from the face that will show upon installing.
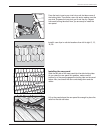
Remove 1" from the return, which is located at the bottom of
the cornice molding. Install into cornice receiver and overlap,
allowing 1/4" for expansion. Be sure the laps are located away
from the heavy traffic areas, when possible.
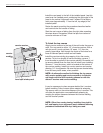
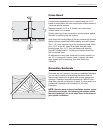
NOTE: An alternative method to finishing the top course
with cornice molding and cornice receiver is to hide the
nail heads with the soffit receiving channel or with the
deluxe F-receiver and cornice molding.
It may be necessary to place a spacer behind the L-receiver
before installing. Foam or some other material is adequate.
The spacer must run the entire distance of the L-receiver. This
will make the application more aesthetically pleasing by
creating the proper clearance between the cornice molding
and the channel pocket.
NOTE: Other than center pinning, installing from right to
left, and lapping to an alignment mark, standard fastening
procedures associated with vinyl siding are used.
102
Wolverine Fit and Finish Installation Guide
cornice receiver
1/4"
1/4"
hand-split shake panel
cornice
molding