


76 SS-SVX09A-EN
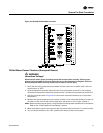
System Pre-Start Procedures
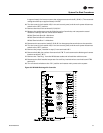
10. “Close” the main power disconnect switch and turn the control circuit switch 1S2, in the unit
control panel, “ON”.
ƽ WARNING
High Voltage is Present at Terminal Block 1TB1 or Unit Disconnect
Switch 1S1.
To prevent injury or death form electrocution, it is the responsibility of the technician to
recognize this hazard and use extreme care when performing service procedures with the
electrical power energized.
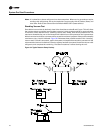
11. At the Chilled Water Controller, use a digital voltmeter to verify there is 24 volts AC across
terminals TR & TR.
12. After approximately 15 seconds, the LEDs on the W7100G should begin to illuminate as the
cooling outputs stage “On”.
13. Set the “Setpoint F” dial at 60ºF; within 15 seconds, the LEDs should turn “Off” as the cooling
outputs stage “Off”.
14. Remove the 1780 ohm resistor from Terminals 6 & 7 and reinstall the wire jumper removed in
step 6.
15. Set the “Setpoint F” dial at 50ºF; within 15 seconds, the LEDs should turn “On” as the cooling
outputs stage “On”.
16. Turn the control circuit switch 1S2, in the unit control panel, to the “OFF” position.
17. Remove the 3,400 ohm resistor from Terminals T & T1 and reconnect the chilled water
temperature sensor leads to Terminals T & T1.
18. Remove the “Test Plug” from the W7100G test socket and reinstall the red dust cover.
19. Plug the reset relay(s) 1K11 and 1k12 (if applicable) back into their receptacle.
20. Turn the control switch 1S2 to the “On” position to restore power to the control system.