


Connecting from a Public Computer
128 Firebox SSL VPN Gateway
To create and configure a kiosk resource
1 Click the Access Policy Manager tab.
2 In the right pane, right-click Kiosk Resources and then click New Kiosk Resource.
3 Type a name for the resource and click OK.
4 To add a file share, under File shares, drag the resource to Shares.
5 Select the applications users are allowed to use in kiosk mode.
6 Select Save kiosk application settings to retain Firefox preferences between sessions. The
preferences are saved on the remote server (hosting the session). Click OK.
7 To add a kiosk resource to one or more groups, click the resource and drag it to the group or groups
to which the policy applies.
Working with File Share Resources
When a user connects with a Web browser and selects A public computer, the Firebox SSL VPN Gate-
way opens a kiosk connection. If file shares are configured, the user can work with files that reside on
the share. Files are not downloaded to the public computer. The network shares available to the user are
configured on the Access Policy Manager tab.
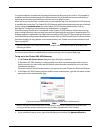
To create a file share resource
1 Click the Access Policy Manager tab.
2 In the right pane, right-click File Share Resources, click New File Share Resource, type a name,
and click OK
3 In Share source, type the path to the share source using the form: //server/share.
4 In Mount type, select the file sharing network protocol, either CIFS/SMB or NFS.
Note
Note: CIFS/SMB is the Common Internet File System/Server Message Block network protocol used for
file sharing in Microsoft Windows. NFS is the Network File System that allows you to mount a disk
partition on a remote computer as if it was on the hard drive on the local computer. NFS is typically used
with Linux computers.
5 If administrative user credentials are required to mount a CIFS/SMB drive, in User name, specify the
user name and in Password, type a password. These fields are not enabled for NFS.
All users who access the share have the rights of this user.
6 In Domain, type the Active Directory domain of the share. This field is not enabled for NFS.
7 In Permissions, specify whether you want remote users to have read/write or read-only
permissions for the share. Click OK.
Note
Note: Users can use the FTP protocol to send and receive files to the remote computer.
After configuring the file share, it must be added to the kiosk resource.
To add a file share to a kiosk resource
1 On the Access Policy Manager tab, in the right-pane, under Kiosk Resources, right-click a
resource, and click Properties.